Wednesday, December 25, 2013

A Merry Little Christmas Party

Last year I co-hosted a Christmas party with my brother to inaugurate his new basement and, of course, to celebrate the holidays! Since I never shared any of the crafty decorations I made for it, I figured a solid year later would be perfect timing. :P


Using some of my favorite crafting media (book pages, branches), I set about making decorations that incorporated materials that I had on hand, or could obtain for cheap. One of my favorites turned out to be the little trees you see lining the window sills above. I got the idea from my bestie, Martha Stewart - the original craft is for place cards, but they made the cutest accents as well. And after the party, I sent them home with guests as mini favors.

The sprigs I snipped from greenery in surrounding areas (like my apt. complex, outside my office, on the way home...lol)

Continuing with the natural theme, I looked for ways to incorporate branches and fresh greenery into the décor.

Always have to have the red and green M&Ms!


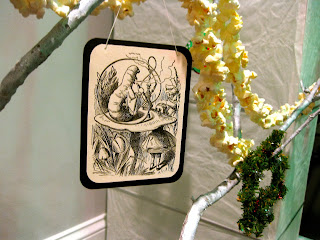
Evergreen sprigs, bits of holly, pinecones, and magnolia leaves worked as well to bring a bit of the outdoors inside. Going with the whimsical, I framed out illustrations from a copy of Alice in Wonderland to hang from the branches of my arrangements. The largest one I adorned with popcorn garlands and mini wreaths in addition to a few paper ball ornaments I made with leftover pieces of patterned paper.


I also used a few of the pages to line the backs of cookie-cutters, turning them into ornaments. Another Martha-inspired craft, although the original craft used wrapping paper instead of book pages.


You might have noticed the little paper trees peeking in the background of different pictures - they were really simple to make, instructions here!


I also used book pages to make a banner (I drew on the letters with Sharpies)...


... and these really sweet wreaths! They were a little time-consuming, but not very difficult. I used some German playing cards that I had on hand to cover the center portion where it tends to get messy (where all the cones come together). You can find the tutorial I used here.

The icicles are just tissue paper!


Cheery fire


A few other fun accents were paper chains, paper medallions, and cheery luminaries lining the front walk. The paper medallions were made using seventeenth-century newspaper articles I had printed out for one of my grad classes (recycle, right?) and old Christmas cards for centers. The luminaries consisted of red paper bags layered over white ones - I used an Exacto knife to cut out a simple design on each of the red bags, then placed Mason jars with tea lights inside (it was a windy/rainy night, if I recall).


We had a full potluck dinner, complete with an impressive variety of desserts, and a white elephant gift exchange, where I'm pretty sure this was the top steal. :) A fun time was had by all who attended!

Friday, December 13, 2013

Found Poems

One weekend last month my mom sent me this pin on Pinterest that she thought I'd like. Well, I didn't like it... I loved it! I immediately set about incorporating it into my lesson plans. My seniors had recently finished up a unit on Romanticism, and while they were slightly burned out reading and analyzing poems, I figured they would still be up for writing some. Or finding them!

"Seek reason for being,
explain the necessity of time."
I began with a brief PowerPoint introducing my students to the concept of found poetry. Found poetry is "a type of poetry created by taking words, phrases, and sometimes whole passages from other sources and reframing them as poetry by making changes in spacing and lines, or by adding or deleting text, thus imparting new meaning" (source: Wikipedia). I showed my students examples such as Jonathan Safran Foer's Tree of Codes, Ronald Johnson's Radi Os, Tom Phillips' A Humument, and Jen Bervin's Nets for inspiration. Once they started to see what it looked like (complete with a step-by-step guide I had created the day before, composing my own found poem in the process), they were ready to set to work! Luckily, I ALWAYS have book pages on hand for crafting, so I simply passed out pages at random and set them loose!

Before I show the finished results, here's the step-by-step process I gave my seniors to guide them:

Step One: Look at your page of prose – do any words stand out to you?


Step Two: Trace a logical path through the text with your words – a theme will emerge along the way.
 

Step Three: Treat the rest of the page in a way that emphasizes your “found poem.”

...BUBBLED!
Bubbling...
...Bubbling...

 So yeah, pretty cool, huh? After passing out the pages, they all settled in to work, and I was so pleased with what they came up with! Check 'em out!


(Click to Enlarge)

He was the only one to
try this technique - and
he worked meticulously!
A nonsensical poem,
sparked by the discovery
of the word "bear."
A few students opted to
incorporate visuals to go
along with their poems.

 
There was such a variety of techniques and color schemes that they employed!


And no, they weren't just "pretty" - check out how profound my students turned out to be! ;) 

"Philosophy is reckoned by me."
"God created worlds, planets and comets, found in immense
spaces and all qualities observable."


"Failed writings remain unknown..."


"The body remarkable
but judged by the lives of many."


"The great demonstrations of a Perfect Being,
the existence of God."


I was so proud, I HAD to display them after I laminated them  (probably one of my favorite aspects of working in a school - access to a laminator!!). Using the wall space between my room and my teacher-neighbor's, I created a "Found Poems" display. These pics only show my students' work (the ones who wanted their poems displayed) - my colleague followed suit the next week, adding her students' poems to the display. It has garnered lots of attention these past few weeks, which is AWESOME. :) Highly recommend.


Handy Halloween Treats

Yikes, this is overdue, but I wanted to put it up now - better late than never, right? These are some handy treats I whipped up for my colleagues right before Halloween this year. The ingredients are simple: clear plastic disposable gloves, popcorn, and candy corn! I wish I could remember where I first saw this idea, but it's been years. I think it was a magazine. At any rate, the process is so easy - the hardest thing is probably tying off the bags once their full, since you tend to have slippery fingers (from the buttery popcorn!). Just drop a piece of candy corn in each finger, then fill the glove with popcorn - you made need to work it a little to fill out each finger. Then tie it off with a twist-tie - I slipped notes on mine as well. Fun, cute, and easy! :)