Whew, this week was looooooooooong. End of the first quarter came on a Wednesday, with no inservice/professional development day. Fellow teachers, you can appreciate the exhaustion I'm still feeling. Since this was my first quarter at my current school, I used it as a chance to feel out my students and the general school atmosphere... and I realized that absences and makeup work are major issues.
It's a well-known fact that absences are a major contributing figure to students' overall grades, but for me as a teacher, they have been causing a bit of chaos in my daily schedule. Students would stroll in at the beginning of the period and ask, "So, what'd I miss yesterday?" Often I'd look at them blankly and be like, "I just taught seniors about
Macbeth for an hour and a half, and I'm trying to switch tracks to sophomore English - there was school yesterday?" Looking backwards whilst moving forwards in the moment is a bit difficult and time-wasting, since the rest of the students are ready to start class. Also - the rhetoric in the student statement above insinuates that it is my, the teacher's, responsibility to catch them up on their missed work. There are waaaaay too many students and waaaaaay too many absences (I had five students out from a single class period on Friday!) for that to be realistic. And the fact that I teach high schoolers should also weigh in here. So, in the spirit of a new quarter, I have made a few changes (students received copies of my new late work policy already!).
One idea I had was hanging a whiteboard in the back of my classroom where I could either record or have a student record our daily activities (we're talking quick jots here) so that I can simply send students there to look and collect their missing work (I have an extra desk and trays standing at the ready!). I started looking around for a weekly whiteboard that was nice and big for my plan, and I discovered that wow, whiteboards are pricy! And most are smaller than I wanted. So, on to DIY!
While Googling, I came across
this post
that contained the awesome idea to use panelboard as whiteboards (there
are tons of suggestions online for various materials, but panelboard is
cheap and easily obtainable). I followed the author's suggestions and
went to Lowe's this weekend on the hunt for panelboard. I found sheets
of 48" by 32" for roughly $11 - score! I plucked out a sheet, then found
the wood-cutting area and had the guys at Lowe's saw it in half
lengthwise. It was my first time doing this sort of thing, and it was
pretty empowering, let me tell you. ;)
 |
| Each piece measures roughly 4' by 1.5' |
Pleased with my new pieces, I brought 'em home, cleaned 'em up, and set
about making them into my weekly work boards. Apologies in advance - my
night-crafting habits have once again resulted in poor pictures.
I measured out five equal sections and lined them with Sharpie so that I could erase without fear of messing up the board. I felt pretty confident, since I had already double-checked on whether or not you can erase permanent marker from whiteboards (there are a variety of ways) so my bases were covered.
 |
| To make it easier on myself, I divvied up the remaining 3" into border space, so my 5 sections were equal. |
 |
| Matted, Marked, Delivered! |
After measuring and marking out the sections, I rummaged around my on-hand materials for an idea for a border (panelboard is unfinished, and like the author warns in her post, the board often splinters a bit at the edges when cut using the store's saw, since it's not made for this material). I found some leftover patterned duct tape that I had used previously to mark out my apartment number on my curbside trash can (you can ALWAYS incorporate flair), which I thought would work perfectly. I had just enough to frame out the boards... though I admit the job is a bit imperfect. However, I seriously doubt my students will mind/notice, and I'm pleased with the look.
 |
| It was easier to thicken the letters from the bottom! |
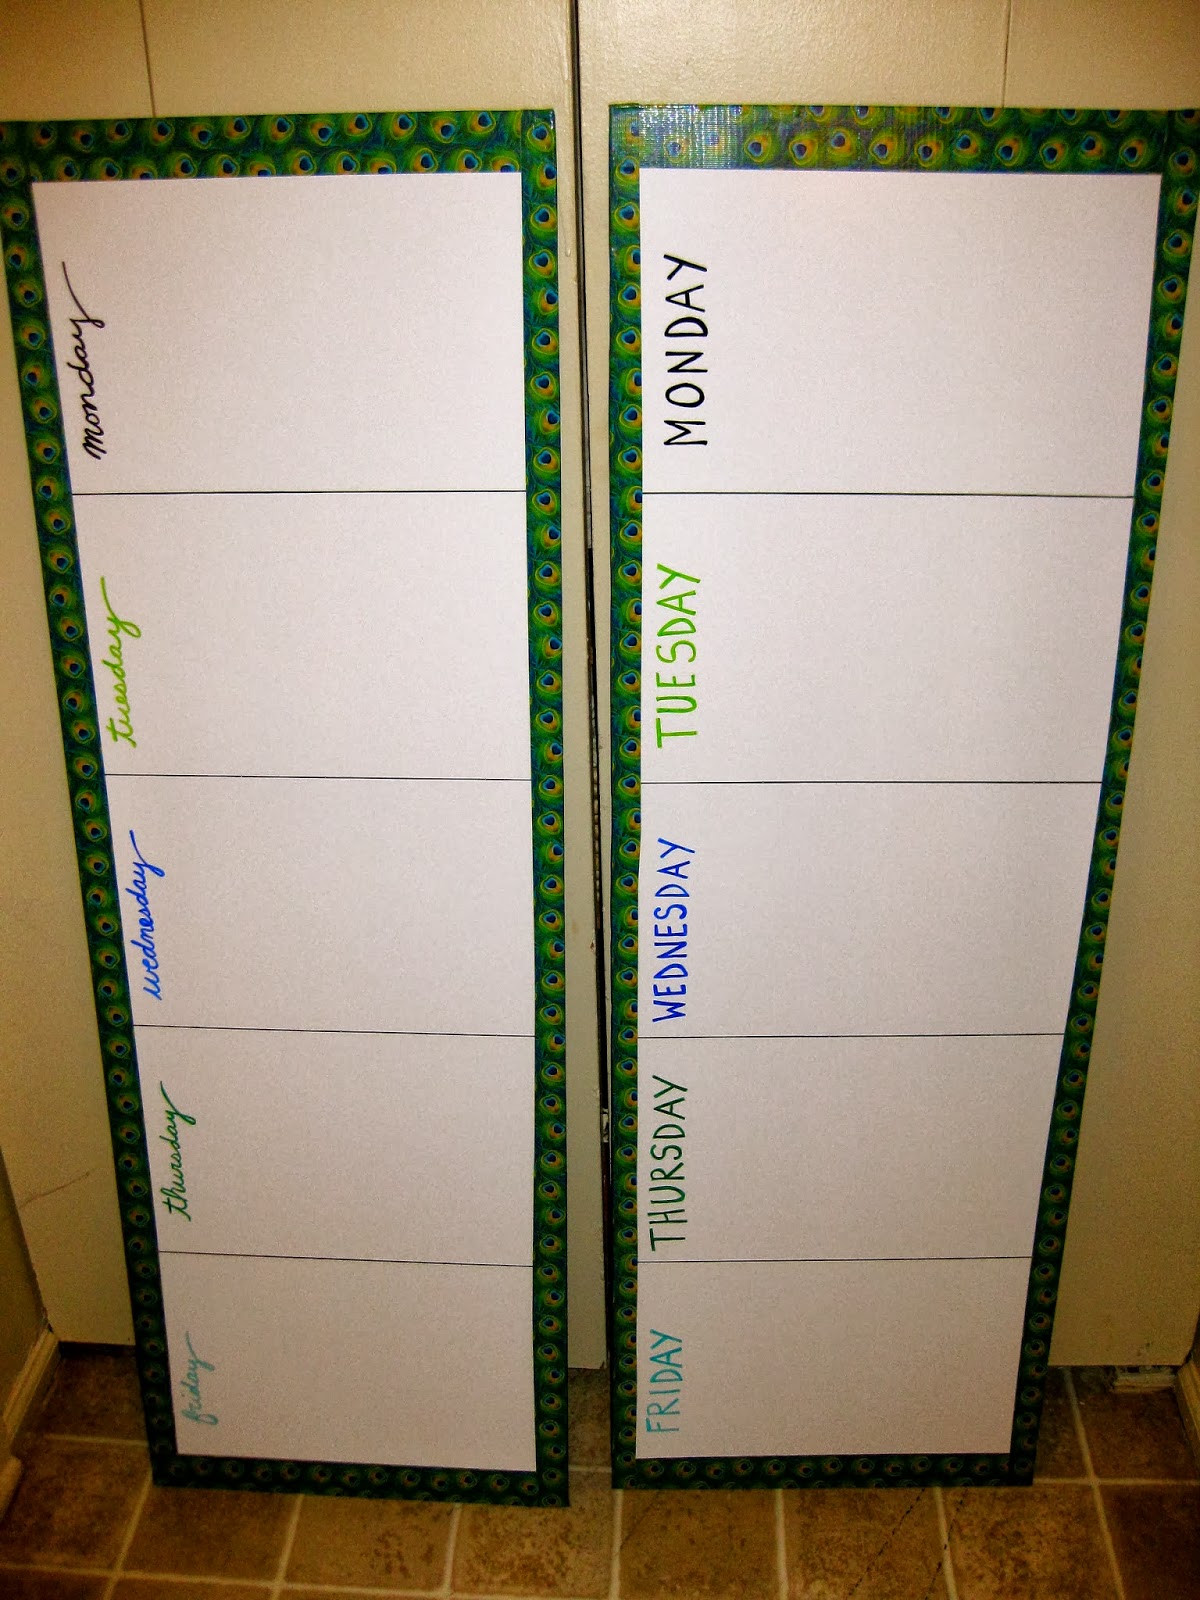
After I did that twice, I had my two boards! But, they were missing one final thing - weekday labels! So I dug out my colored Sharpies and set to work. I chose colors that matched the border design and varied my fonts to help differentiate the boards for my two grade levels. They came out so nice, I think they'll help ease the annoyance of having to track so many absences/makeup work. :P Here are a few shots of the finished products!
And here they are in their new home! Together with the trays for makeup work, I think they will really help me (and my students) stay on top of missing work. When students come in after an absence (a daily occurrence), I can send them to the back and say, "Look at the board and your period's tray." Zero excuses, little students. Zero excuses. ;)
It's much easier for me to toss in makeup papers per period than return to
the task later. Also, since the trays are in the back of the room, I can
simply add the number of makeup papers with the papers I'm passing out to that row already and have a
student place them in the appropriate tray. I also am thinking of asking different
students to record the day's activities at the end of the period (one
less thing for me to do!) - thanks for the idea, Mom!