Friday, June 28, 2013

Decorations and Details

Ok, so this final Cirque post is about all the fun little details and embellishments that added to the overall ambiance of "A Night at Le Cirque des Rêves." Most don't fit into a particular category, but I've done my best arranging them below - just a heads up, it's a longer post, chock-full of pictures and ideas! Thanks to all who have read this series of posts about my combo birthday/graduation party this past May, and especially to those who have written/said such sweet things about my efforts! It's fun sharing my hobby/grad school escapism with others! ;) I hope it inspires you to at least read Erin Morgenstern's book, if not throw an awesome soirée of your own!


Playing Cards:
Pins like these convinced me to incorporate playing cards into my décor (coupled with the fact that card suits match the color theme!).


I used a combination of mini decks of cards from Michaels and full-sized sets from Dollar Tree for the following décor elements.

I used some of the  mini cards leftover from decorating my Magicians Game as pennants attached to black and white
baker's twine with clear tape. The posters are from the Library of Congress photo archive.
If you look closely, you can see card streamers!
My mom whipped them up on her sewing machine.


Regular-sized cards lined the basement stairwell.


I actually just used the pin as a guide,
attaching the cards together with Scotch tape.
Finished! The pattern uses all 52 cards in the deck - I chose to display the fronts of the clubs and spades suits.

I even incorporated playing cards into my outfit! Inspired by an Etsy item, my mom created a bowtie from a five-of-hearts card (symbolic for my birthday! AND her love, of course!), which I attached to a necklace chain using jump rings. Pretty awesome, no?


I also had fun accenting my nails - I just painted a coat of white nail polish, then used a Sharpie to draw on stripes once the polish had dried (my roomie did my right hand for me!). I then layered on a clear top coat, since I knew I was doing some heavy-duty setup before the party.


Food Table Accents:

One more use for the mini playing cards was in a centerpiece for the food table (though it ended up a bit to the side!). I just made little fans of cards and tucked them into a photo holder I had on hand.
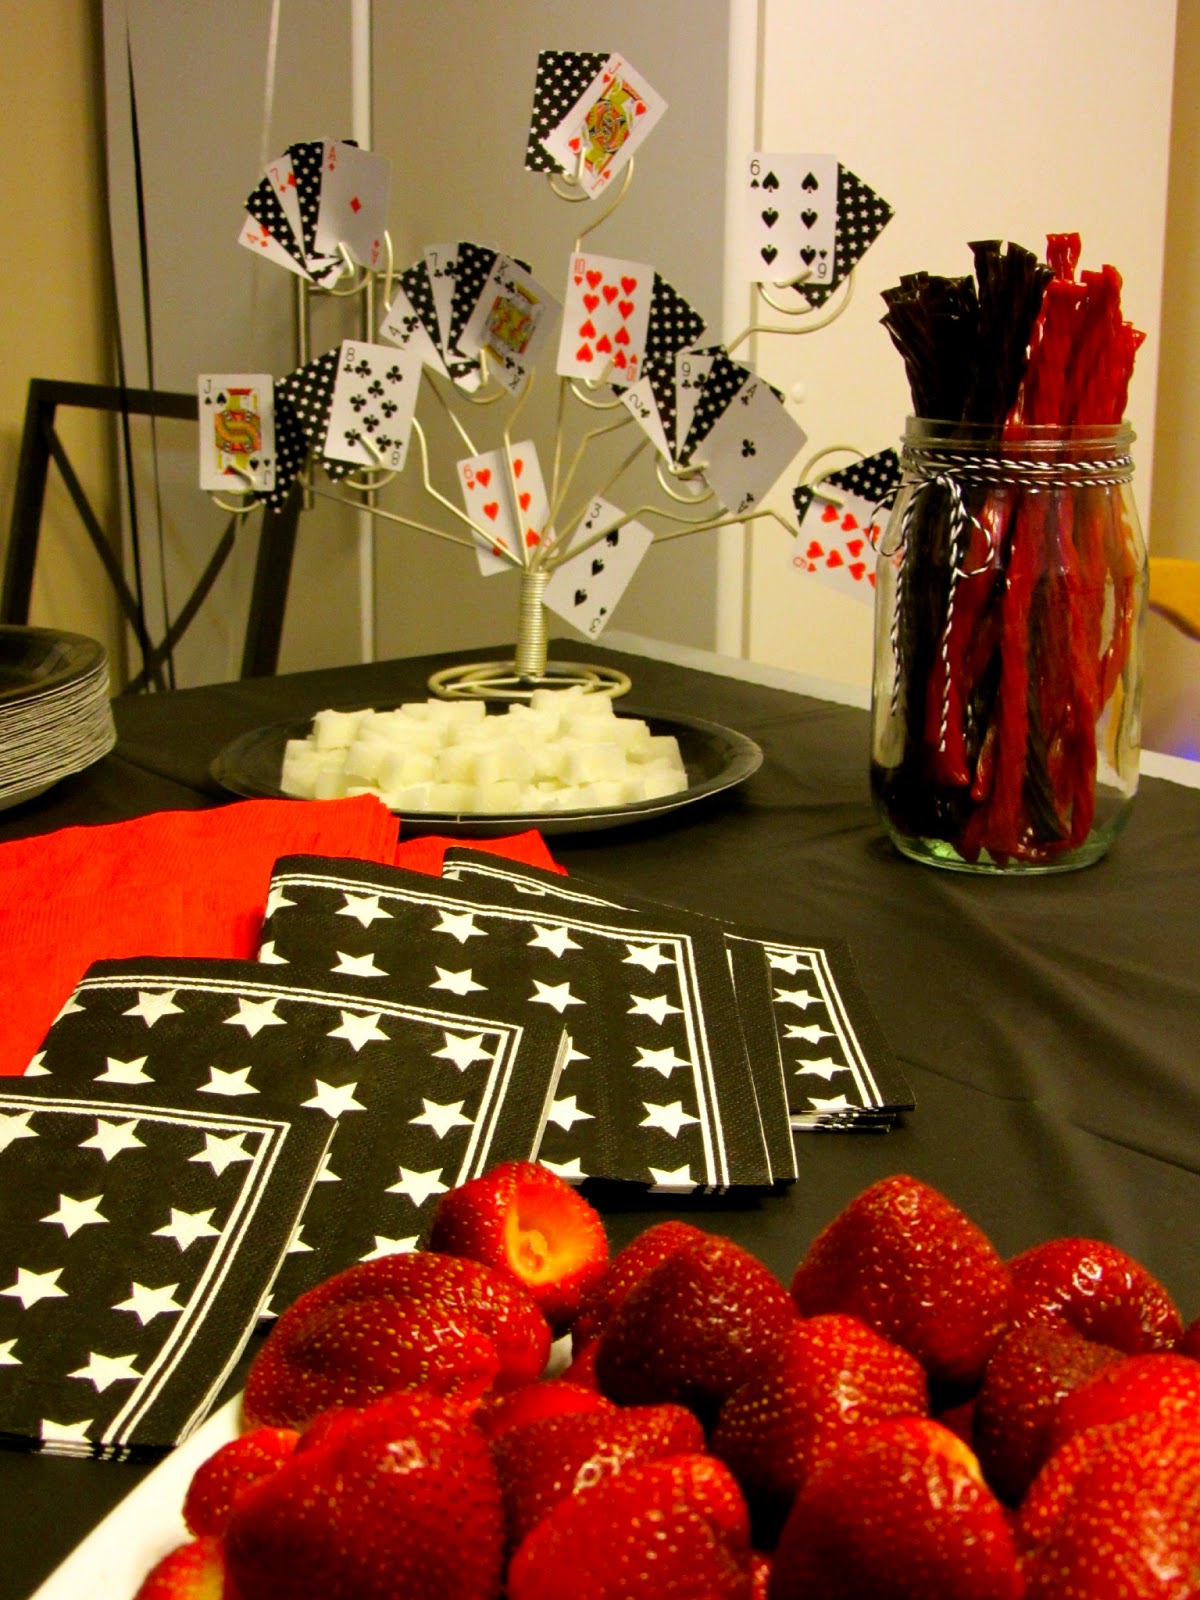
Mmmmmm...

A strip of Scotch tape on the back held the little fans together


On the other side of the table (and already featured in my Cirque snacks post) was a three-tiered tray that my mom assembled after I found these instructions on a dollar store craft blog I follow. I opted for three round metallic trays from Dollar Tree and used two 'crystal' candlesticks for supports, like the instructions suggested.

My one and only in-progress shot of this
project - my mother is fast!
The final product! We spray painted the tops a flat black,
leaving alone the metallic undersides and candlesticks.
For a better shot of the underside, see this post.


To hold the goodies, I fancied up some clear plastic plates from Dollar Tree with an easy-but-super-neat method of using Mod Podge to adhere decorative undersides. A central symbol in The Night Circus  is a clock, so I found an image of a vintage clock face that I liked through Google Image search and re-sized it to fit my plates before printing out copies in black and white. Once I had all of my clock faces trimmed out and ready, I simply coated the underside of a plastic plate with Mod Podge and smoothed on the clock face so that it was visible from the top of the plate. I didn't do a second coat since it made bubbles in my test run and really, the initial coat was plenty (they were disposable plates after all). Took hardly any time or money (the plates were eight for a dollar), but they were one of my favorite details of the night!

I saved my leftover clock faces, which came in handy - I used one to cover up an unsightly bunch of streamer ends at the center of my ceiling display:


I got the idea from this pin, and when I had to switch tracks from backyard carnival to indoor party, I used the streamer arrangement to help create the feeling of being within a circus tent. I lined the room with lights (we cheated and used the tops of windowsills to support their weight, since I didn't want to mark up the walls) and had the streamers cut off at the light line. It gave a cool effect, no matter how hastily thought-out it was - especially with all the other lights off.


Speaking of lighting, you may have noticed the little lamps on the food table in the earlier picture of the tiered cupcake tray - another Pinterest-inspired project! I originally was on the fence about attempting it, but when I found the mini lampshades at a local thriftstore for 50 cents each, I was all over it! I picked up two glasses for bases at the same store, too, for $1 a pop (I think they might be hock glasses, according to this chart...?). I added a grosgrain ribbon accent to each shade and made a few fitting adjustments to their light bulb clips, and suddenly I had two adorable little lamps!

Not the best for resting on a glass rim...
... but a few tweaks with pliers solved that problem!

 
I used LED candles (provided by my brother and featured in my vintage photo displays post and the magicians game post) in these mini lamps, a few porch luminaries, and in decorative table groupings. I used ribbon and the paper outlines left over from punching out my elephant silhouettes to decorate the candles in a non-permanent manner, since I was returning them after the party.

I also used these bags to send home food
and favors with guests as they left!


Black elastics helped hold the paper in place


Plain old double-stick tape did the trick for attaching ribbon to the votives!

A decorative table grouping!

Aren't these little tents incredible? Through Pinterest I found this circus tent template, which I photocopied in varying sizes onto white cardstock and filled in with a Sharpie. The little flags are toothpicks and bits of black cardstock.

I also had a few plastic animals that I picked up at Dollar Tree and Michaels and spray painted either black or white, which I distributed throughout the rooms. It took a few coats of paint to cover up their slightly lurid original colors, but it was worth the effort.

From eek...

... to chic!

I proudly displayed my updated animals on game tables alongside prizes. While I used this photo (left) to show my ring toss setup in my circus games post, I neglected to talk about the chalkboard signs that displayed the game names. So, a brief sidebar, if you will. I found these cute mini chalkboards on sale at A.C. Moore for 88 cents each, so I nabbed three. After a ribbon blitz at Hobby Lobby and Michaels one afternoon, I had plenty of options for decorating them, finally settling on a combo of two varieties: a vintage stamped pattern of carnival tickets (how PERFECT?) and a classic black/white striped pattern. Since they were intended for backyard use, I had my dad attach them to dowel rods with sharpened ends for easier posting. They worked pretty well propped/duct taped to game tables, too. ;)

I'm in love with this ticket ribbon.


Cutest balloon animal EVER
Back to animals, though. Another animal appearance at the party were balloon animals! I was thrilled when I found a packet of red tying balloons on eBay for a few dollars (have you ever tried bargain shopping for specifically-colored tying balloons?). I also had a few helium balloons, but I used them sparingly, since helium is a bit hard to come by these days and therefore expensive. I made balloon weights for my groupings of black and white latex balloons using a few rocks (free!), metallic foil gift wrap (from Dollar Tree!), and wire garland (on sale at Michaels for 50 cents!). They were easy, cute, and cost-efficient (balloon weights are usually a dollar a pop at their cheapest).

Wrap rock, secure with wire, making a loop for tying
Rocks from the railroad (shhh!)


Supplies


This was before I found out how expensive helium was, so there are lots of balloon weights... which went unused.
But they were pretty, nonetheless!

Perhaps the most expansive decorative element (well, second to the ceiling streamers) was the paper medallions installation in the basement. Originally intended as a backdrop for the food table in the backyard, they looked even better indoors hanging in front of my brother's backlit closet doors.
See what I mean?


I fell in love with the idea when I saw this pin (left), although I knew my version wouldn't be as densely clustered since I was covering a wider space. I tried and tried to find black copy paper, but beyond special ordering (which means big bucks), the search was fruitless. So, I decided to make all of the medallions out of plain white copy paper, then spray paint some of them black. They were a single-use type of decoration, so I wasn't too worried about the paper getting a little crunchy from the spray paint. My friend Kathryn gets MAJOR props for helping me fold the dozens of medallions I needed in one afternoon. We made them in three different sizes, then strung them on twine of various lengths - we stored them by stacking each strand's medallions on top of each other and paper-clipping them together to avoid tangles. The method worked pretty well, they weren't difficult to extricate when I laid them out for spray painting (I re-packed them the same way for transport to the party). Stringing them on twine and hanging them a bit away from the wall meant that they twirled and floated - exactly the effect I wanted. And it only cost me the price of the spray paint!

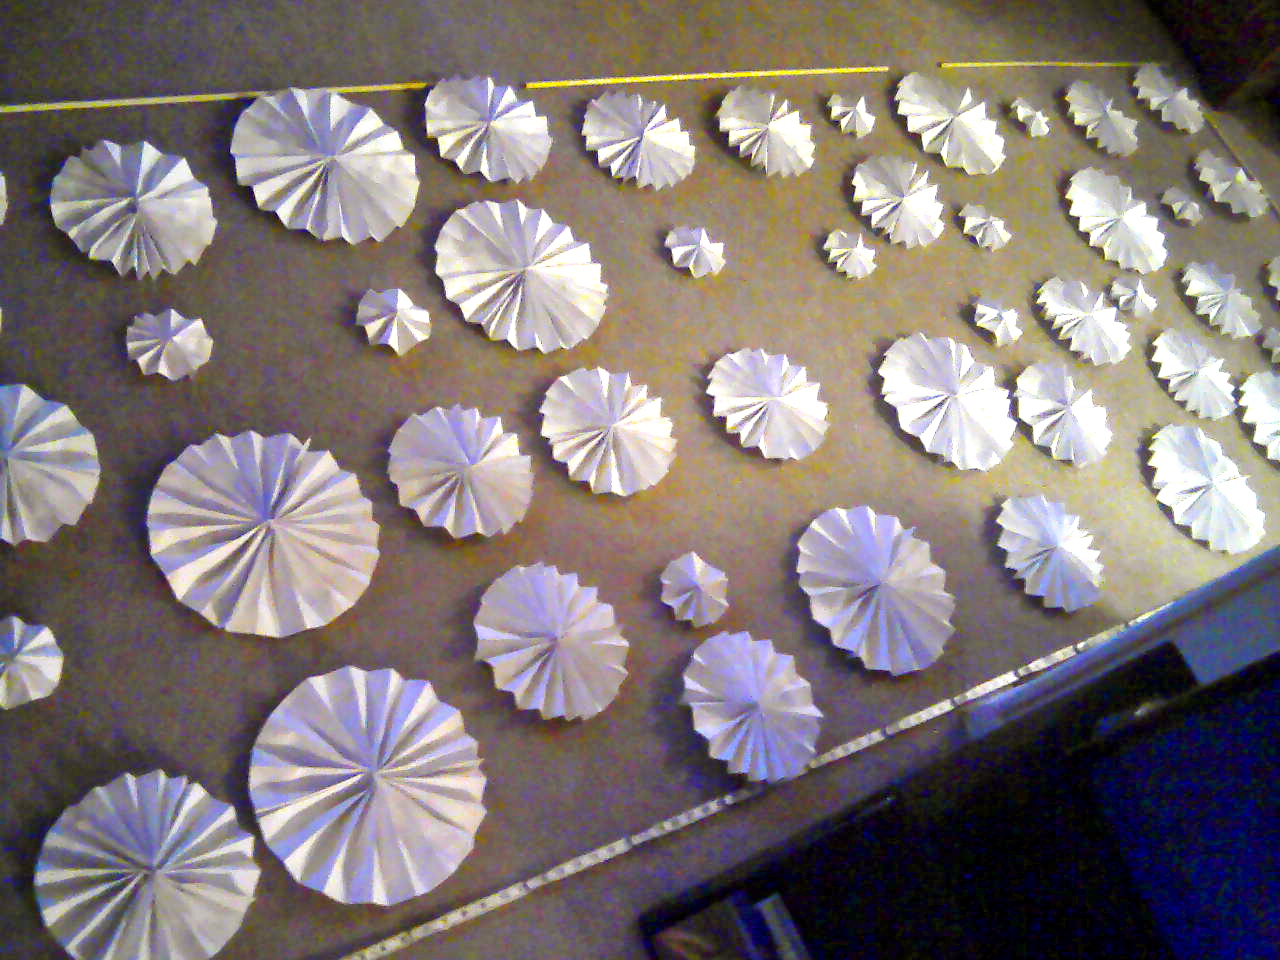
We measured out the wall space I wanted to cover
to ensure we had enough medallions. Sorry for the grainy phone pic!
I laid out each strand in my parent's backyard (Sadie was curious!).

I spray painted medallions at random, then flipped them over
once they were dry to spray paint their backs.

And of course, some glamor shots of the wall at the party!


We blew up some of the leftover balloons and littered the basement floor with them for added fun. You may ask, "Aren't twenty-somethings a little too old to kick around balloons?" And you'd be wrong. ;)

And with that, the cirque posts have come to an end! Thanks for reading, and I hope you've been inspired!
The walk feels longer in the stillness of the night, no crowds of people heading to the circus along his route as there have been every other evening, when he raced to arrive before the opening of the gates. The stars are still out when Bailey reaches his oak tree, his bag slung over his shoulder. He is later than he’d wanted to be, though dawn is some time away. But beneath the starry sky, the field that stretches out below his tree is empty, as though nothing has ever occupied the space but grass and leaves and fog.

Friday, June 21, 2013

Cirque Snacks

All the food at "A Night at Le Cirque des Rêves" was black (read: chocolate), white, and/or red. We had strawberries, chocolate and strawberry Twizzlers, chips and salsa, and more! I also tried out a few Pinterest-inspired treat ideas (specifically chocolate mice, cupcakes with toppers, molded sugar cubes, and some popcorn and animal crackers movie snacks) for the party, which I'll detail below. 

Party Treat #1: Chocolate Mice 


As he continues to walk around the circus, Bailey’s path leads back to the courtyard. He stops briefly to watch the sparkling bonfire and then at a vendor to purchase a bag of chocolates to make up for his mostly uneaten dinner. The chocolates are shaped like mice, with almond ears and licorice tails. He eats two immediately and puts the rest of the bag in the pocket of his coat, hoping they will not melt.


Some of the best food items mentioned in The Night Circus are the chocolate mice, and there are all sorts of recipes for making your own. The one I used results in more of a cookie, and it's originally a Christmas recipe, but judge for yourselves how awesome the finished results are!

Here's the recipe:
  • 2/3 cup semisweet chocolate chips (I thought about subbing in milk chocolate, but chickened out, not wanting the project to become a Pinterest fail - next time I'll definitely pull a switcheroo, since I prefer milk chocolate to semisweet)
  • 2 cups chocolate wafer crumbs, divided (I originally wanted chocolate Nilla wafers, but I couldn't find them anywhere, so instead I used Oreo cookies, scraped free of icing)
  • 1/3 cup sour cream 
  • 1/4 cup sliced almonds 
  • 18 pieces black shoestring licorice (2 inches each) (I actually found this at Target in the cake-decorating section, but Walmart has it, too - it was pricier than I wanted, but I'm glad I caved - the little tails MADE the mice, seriously)
  • 36 red nonpareils (I opted to leave these out)
Step One: In a microwave, melt chocolate chips; stir until smooth. Stir in 1 cup crumbs and sour cream. Cover and refrigerate for 1 hour or until easy to handle.
Step Two: For each mouse, roll about 1 tablespoon chocolate mixture into a ball, tapering one end to resemble a mouse. Roll in remaining chocolate crumbs to coat. Position almond slices for ears and licorice pieces for tails. Yield: 1-1/2 dozen.

The process was as easy as it seems, and the mice were a hit. Because I wasn't sure if 18 mice would be enough, I increased the recipe to yield more (I think I halved it and added that to the total, yielding 27-28, if that makes sense). Anyway, I didn't have a single chocolate mouse leftover. Yup, they were all gobbled up!

Ready to decorate!


All the scraped-out Oreo icing!


Awwwwww.

I nestled the little chocolate mice in extra baking cups I had after making cupcakes - that way I could avoid another large serving platter and they were mess-free to serve.

Party Treat #2: Cupcakes with Silhouette Toppers

Source: etsy.com via caritasity on Pinterest
After I pinned this idea of silhouette cupcake toppers on my then-private planning board, my mom informed me that her Cricut machine did indeed have an elephant pattern! I decided to use black cardstock, which turned out nicely. And I discovered black-and-white striped baking cups in a Michaels deals section for only $1.50! After buying some red crystal sprinkles, I was ready to whip up some themed cupcakes! Since my party was at my brother's house (which is located on the other side of D.C., a 40-minute drive away), I elected to ice the cupcakes there. It made my drive over a little less stressful, and I was able to enlist my friend Kathryn's help!

Ready to travel!
I made a full two-dozen cupcakes


Rushing to finish!


The chocolate mice and cupcakes on display!


Detail shot of yummy finished cupcake!
Putting my Dollar Tree tiered tray to use!


Party Treat #3: Molded Sugar Cubes 

Another idea I saw that I wanted to try out was molded sugar - the recipe seemed simple enough: take sugar, add water until the mixture is the consistency of wet sand, then press into mold. While the original inspiration (at left) had skull-shaped cubes, I didn't think they were quite on theme for "A Night at Le Cirque des Rêves." However, during one of my thrift store visits, I found the PERFECT ice tray to use - this star cubes tray from IKEA! It had a deeper setting than the skull tray, so my resulting sugar cubes were somewhat larger.

While the process was simple enough, I still learned a few tips and tricks to this project, which I'd like to share:

Tip #1: When using irregular molds for your sugar cubes (i.e. a star shape with multiple narrow, sharp angles), it's best to create a custom presser to pack the sugar in (see pics below). Your finger is just not the tool needed here.
Tip #2: Speaking of fingers, sugar particles are a lot like sand, meaning they are scratchy. I was surprised to find little cuts and roughed up cuticles on my fingers in the days following the party, and I've concluded that it had to have been the sugar (I mixed the water and sugar together by hand, scrunching the mixture the way one does wet sand). Strange side effect, but one to be wary of nevertheless!
Tip #3: Leftover sugar cubes can be used in your morning coffee! Since the cubes turned out to be a bit on the larger side, a few party-goers abstained - and I had made plenty to go around!

My little custom presser made from cardboard and duct tape!
A perfect-enough fit!
Filled tray, with some leftover water/sugar mixture in the bowl.
Finished products! I loved how sharply defined they were - I let them dry and harden overnight before packing them up.

Party Treats #4 and #5: Animal Cracker Snack Bags and Popcorn Cups 

As part of the fun, I Netflixed The Greatest Show on Earth, a circus movie from 1952 (it had Charlton Heston in it!). To be honest, we didn't really follow the storyline too well, and it was super long, so no one braved it to the end (we started it a little late in the evening). But, it had awesome scenes of real circus performers from the 50's, which we all enjoyed!


To accompany the movie, I made these:

Circus Animal Crackers! (I found the fabric at Hobby Lobby)
I got the idea on Pinterest, of course! I found the clipart online through Google Image Search, and I printed it out onto sticker paper. I paired the stickers with black cardstock and baker's twine to create my bag toppers, and I used pretzel bags for a unique shape. Use whatever bag you purchase as a template for the width of your toppers - and be sure to leave room for the staples (both on the topper and in regards to filling the bag with treats)!

Supplies at the ready!
I wrapped the baker's twine around the front, then taped it down
The sticker hides the tape
See?


To give a sense of how many animal crackers I used -
these were the leftovers after making 25 snack bags
After filling the bag with animal crackers, I
attached the topper using a stapler, much the
same as I did with my Testudo Treats


I stored them in Ziploc bags to keep them from getting stale

I also made popcorn cups to accompany the bags - but I didn't get any pictures of those! So, I'll fill in with my inspiration pic (top left corner image):


And the images of my materials:

My themed popcorn of choice ;)
Black Paper Cups


 I created a label for the cups using the following elements, which I printed on sticker paper. Since the elephant silhouette wasn't a GIF (meaning it had a white background around it, so I couldn't combine the elements as easily as I wanted to in Word), I simply ran the paper through the printer twice - the first time to get the background image, the second time to layer the silhouette over top!

The background is a recolored version of an image from this collection and the elephant silhouette is from Graphics Fairy.

Aaaaand that's all, folks! Thanks for making it to the end of my rather lengthy, slightly picture-heavy foodie post! :)