Sunday, March 31, 2013

Hoppy Easter!

I found these little Easter boxes at Target a few weeks back and decided to use them as Easter candy-holders for a few friends. I whipped up their presentation pretty quickly (it's been a busy week!), and since they still came out pretty cute, I thought I'd share:


I lined the boxes with sheets of purple and yellow tissue paper, filled them with jelly beans, and tucked in a little card that I made with cardstock and my favorite material: old book! After cutting out four sets of bunny ears and heads, I used a glue stick to attach them to my cards (that I prepped with a border), which taper at the bottom to fit in the boxes better. Then I finished them off with whiskers and a choice cliché - and voilà! Happy Easter, folks!


"Do not be afraid, for I know that you are looking for Jesus, who was crucified. 
He is not here; he has risen, just as he said."

Friday, March 29, 2013

Pancake Critters

A few weeks ago I came across an article in Reader's Digest about pancake recipes - they had all sorts of cool ideas, so I cut/pasted (in the literal sense) the ones I liked to a recipe card, which I brought with me when I visited my parents' home over break. The top two contenders were lacy pancakes and rainbow pancakes.

So intricate...

... so colorful!


Let's do a mashup!


The ingredients for these are pretty basic (beyond typical pancake fixin's) - a squeeze bottle for the lacy pancakes and food coloring for the rainbow ones. When I found a yellow squeeze bottle (originally for mustard) in the picnic section of Dollar General for 50 cents, it was on! My mom and I whipped up some pancake batter (using almond milk - yay lactose intolerance!) and added in green food coloring until we liked the shade. Then we used a funnel and poured it into our squeeze bottle. I should note that the bottle's nozzle was a bit narrow at first, so we snipped off the end of it to make a bigger passageway for the batter beforehand. Now we were ready to make lacy, delicate pancakes! Except, the first attempt was too lacy and broke apart. And the second attempt looked like this:


Yeah... that's supposed to be a flower - when my dad saw the picture, he said, "Oh, an amoeba!" Luckily, it gave my mom an idea, or else we would have canned the whole thing.

She set to work on a fresh creation...

... and made this little guy! Yes, the candy eyes have made another appearance. :)


I thought that was pretty spiffy, so I decided to slightly display some terp affiliation and try my own little turtle:


And he came out SO GOOD! And then I ate him.


After those successes, we let our imaginations take over and had all sorts of fun making and eating our critters. Check them out! And TRY THIS YOURSELF! Especially if you have kids. It's super easy and super fun!

Swirly Snail
A Crab!
Dragonfly
Even a Monkey!
Pancake Fish!

Friday, March 22, 2013

Penguin Feet and Marshmallow Teeth

Since I've been at my parents' home in DE the past week, taking a break from D.C. and working on graduate work (yay Spring Break), I thought I'd collaborate with my momma on this post and bring you a few of her Pinterest-inspired classroom crafts! She teaches first grade in a private school, and like any good elementary school teacher, she often displays her students' artwork in the hallway outside of her classroom. The photo below shows one of her January crafts, footprint penguins:


I've gotta admit, they are pretty cute. When I asked my mom where she got the idea to do a penguin craft, she replied simply, "Because it was winter." Well, I really can't argue with that. I mean, it makes sense. She did offer a bit more in terms of where the idea for footprint penguins originated. As a fan of 'Pi-nin-terest' (don't worry, we've worked that pronunciation out), she simply typed in 'penguin' and received results like these:


She then mixed together a few of these ideas for her own take on footprint penguins, one that was feasible for her classroom. She had her students come back individually during seatwork time (which comes after reading groups, in case you were wondering about the timeline here) to make their footprints - they painted one foot black and placed it on paper, which was simultaneously cold (the paint) and hilarious (they had their feet on the READING TABLE!). Later, they painted their little white bellies, dotted and connected their earmuffs (gotta love the bingo marker!), and attached paper beaks, wings, and eyes. They were a huge hallway hit - after Mom removed them in preparation for another display, a parent walked by and commented, "Aw, you took down the penguins!" That's high praise in the education profession, let me tell you. ;)

Some Footprint Penguin Exemplars

For Illustrative Purposes Only
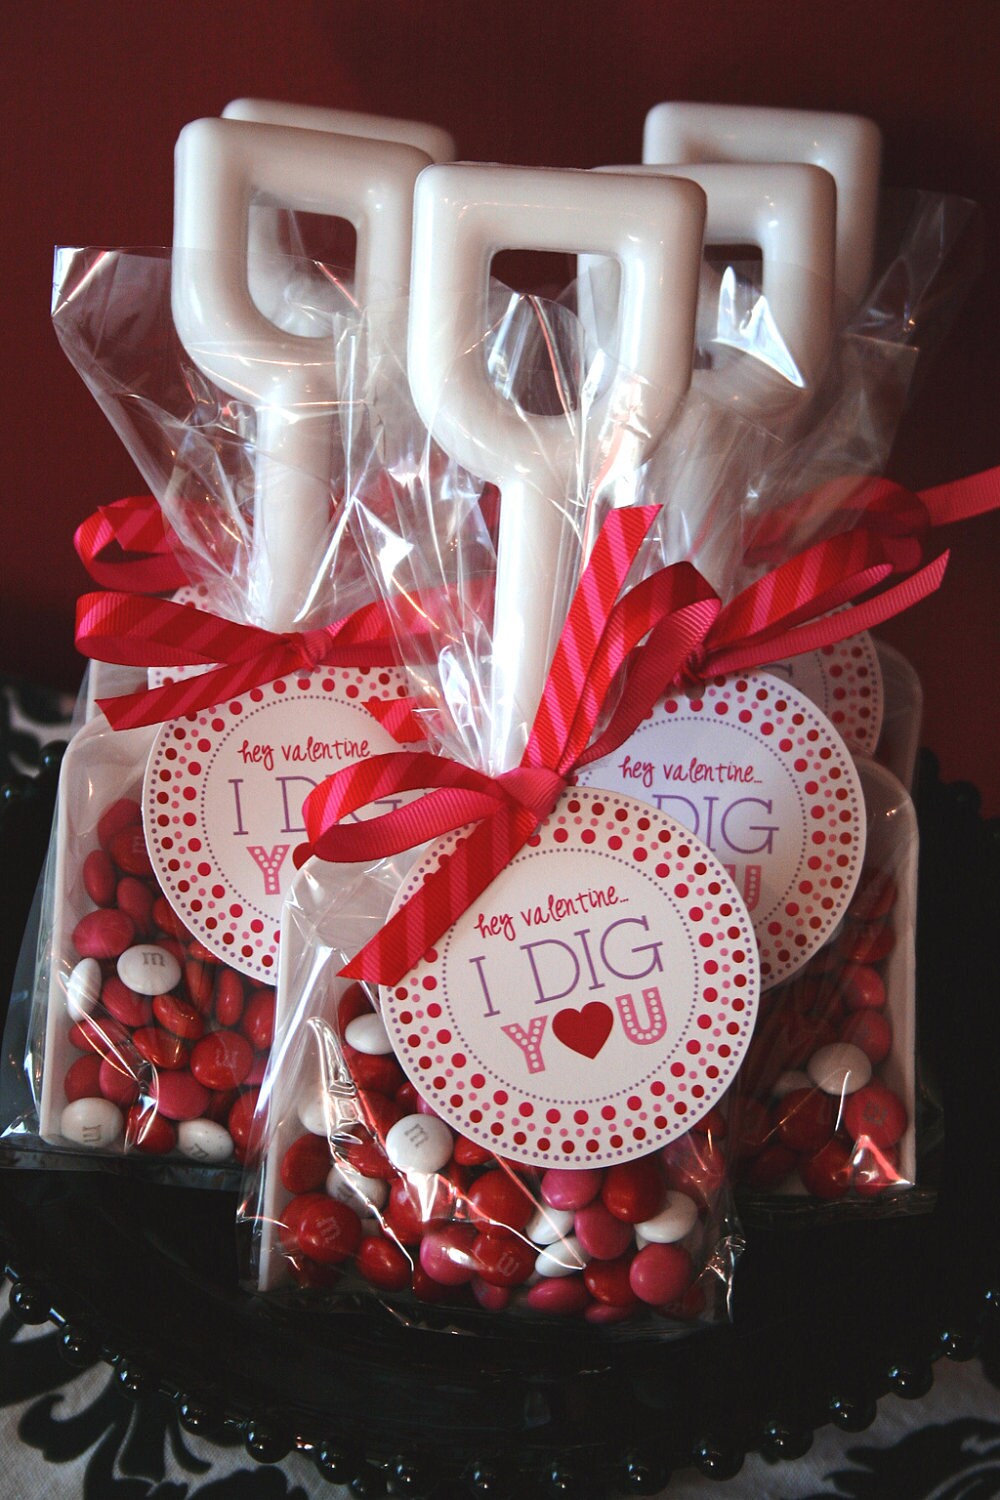
Moving into February - more specifically, Valentine's Day! There's this really cute craft on Pinterest and Etsy that combines plastic shovels, candy, and cute baggies with some sort of note that says something to the effect of "I dig you, Valentine!" Cute and simple, yes. Inexpensive? Not so much. My example to the left from an Etsy shop costs $9.00 for the printable. That's just the electronic file of the tag. JUST A PICTURE OF A TAG COSTS NINE DOLLARS?!? Crazy. So, undeterred, my mom went on a search for plastic shovels to make her own version (the apple doesn't fall far from the tree, folks), and while she found shovels (good), they cost a dollar a pop (bad when you have seventeen students). So, my mom decided that maybe she didn't totally dig her students an entire shovel-full. Maybe just more like a spoonful, à la Frank Morris and the Anglin brothers. And red spoons were ten for a dollar. ;)

Spoon Guy!


Combining the spoons with items she already had on hand (except for a bag of Valentine M&Ms, which she purchased for the craft), she was able to create a bunch of these little cuties (at right). She melted some almond bark chocolate in the microwave and drizzled it on each of the spoons, pressing in M&M noses and candy eyeballs (from Hobby Lobby! and now Walmart, since we were running low) before the chocolate hardened. Then she just used lollipop bags (yup, that's their technical term) and ribbon to fix them up for distribution! Her kids' reaction? Laughter, followed by immediate consumption.


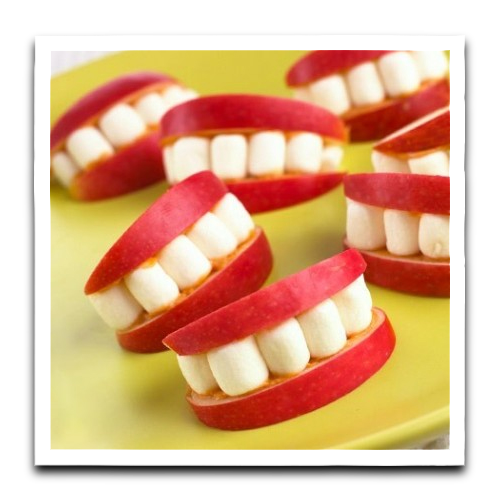
The week following these gifts of chocolate spoonfuls was Dental Health Week. Nice, right? According to my mom, "Kids are always told to brush their teeth, brush their teeth, brush their teeth, so I decided to zero in on flossing this time." Typing "dental health" into Pinterest returned this board, and one of the crafts fit perfectly with the whole flossing angle. And it gave Mom a use for the leftover marshmallows from December's gingerbread houses. Always frugal, my mother. The steps were simple - students were given folded pieces of pink paper and told to draw a curve like a rainbow to cut along. Apparently, several of them equate rainbows to triangles and ended up with what my mom termed "an alligator mouth." The alligator mouths did not make it into the photo at left - we restricted photography to mouths that resembled those of humans (despite the marshmallow teeth). Oh, and the most important part - after gluing in their teeth, students strung floss and secured it between teeth with glue drops.

Another activity for Dental Health Week was a brushing chart that students took home and recorded five days' worth of morning and night teeth-brushing sessions - if they turned it in, completed, at the end of the week they got a "good for your teeth treat." Ah, positive reinforcement, I miss you. I would love bags of Skittles for my grad work right now. But, that's besides the point. My mom originally found these apple mouths on Pinterest:


Ok, so that last one wasn't originally on the list. I just saw it and thought it was so cute! And counterproductive to dental health. But, whatever. Anyway, the first two are legit. However, they were immediate no-gos for my mom, since she has a student who is allergic to peanuts (the teeth in the left pic are peanuts and PB holds the marshmallows in place in the center one). We're talking can't-sit-at-same-lunch-table-as-students-with-PBandJ-sandwiches allergic. So, my mom improvised and used her candy eyes and some fruit roll-ups (remember those?) to make these little guys:

She was pretty pleased with her little apple mouths and their fruity tongues, whereas my first reaction was somewhere along the lines of "ew, bloody mouths!" Then I wondered if tongues could really be factored into the DENTAL health equation... I mean, they aren't like gums, which are dental by association (Listerine gingivitis commercials anyone?). But, the kids had neither reaction and gobbled these fellas right up! Come to think of it, I probably would too. ;)

And now you can see how my mother and I are living proof that the craft gene is indeed passed down from mother to daughter, it just mutates in the process - one may sew and make cards (my mom) whereas the other is incredibly beautiful and talented. Whoops, that's not necessarily crafty. But I'll let it stand. :P

Friday, March 15, 2013

Wedding Cross Stitch: Joshua 24:15

Yup, I did it again. I'm kinda shameless like that. The Story: I was invited to my friend Scott's wedding, which took place on New Years Eve near Lynchburg, VA (the town of his fiancee's alma mater). It was a destination wedding, in a sense, since we had to book hotel rooms, and that cost me a bit more (ok, double) what I usually budget for a gift. Discussion abounds on the etiquette of gift-giving for destination weddings (yes, I realize they usually involve beaches or other countries), but long story short, my poor-little-grad-student self elected to take the handmade route! :)

I came across this blog post and fell in love with the pattern - I felt it would not only commemorate Scott and Katie's new home together, but it also reflected their shared passion for missions:


Unlike the lovebird pattern I used for Laurie and Ross' wedding cross stitch, this one was much easier to enlarge and print as a pattern - it even came with measurements. I did add an extra little detail to the design, though:

Sorry for the reflection - this was taken after I framed it!

Isn't it cute? I got the idea from the wedding invitations, which (I'm pretty sure) were an homage to Katie's maiden name. I had found the mini castle pattern on this site a few months earlier - that's why it's always a good idea to tuck these things away! I made a few adjustments, stitched in a few rolling hills, but overall kept pretty true to the pattern below:


Since the verse results in a narrow rectangular design, I knew that I wanted to mat it out somehow to fit an 8"x10" frame. As I've mentioned previously, Michaels has this really neat textured felt - it's a pretty small selection, but lo and behold, they had a stonework one in a really nice grey that complemented my design concept brilliantly! I also picked up some black grosgrain ribbon at Hobby Lobby (they sell these itty bitty spools that are perfect for crafting projects!) to 'hem' my stitched piece on the felt matting and scored a nice 8"x10" frame there as well. After assembling, here's the finished result:


I love the incorporation of the castle imagery and stonework with the idea of a household. But, that's just me. Hopefully the newlyweds can find a place for it in their, well, new household. :P

Bonus Segment: I really liked how the wrapping turned out for this gift, so I took a shot of it to share! I had found another mini ribbon spool in a clearance bin at Hobby Lobby that was patterned with the letter "S," which was perfect since Scott's last name begins with an "S." And I had nabbed the "Eat, Drink, & Be Married!" ribbon on clearance at Michaels a few weeks earlier. Combined with some chic black, grey, and white striped wrapping paper (courtesy of my roomie!), it came out rather nicely, I thought.

"But if serving the Lord seems undesirable to you, then choose for yourselves this day whom you will serve, whether the gods your ancestors served beyond the Euphrates, or the gods of the Amorites, in whose land you are living. But as for me and my household, we will serve the Lord." -- A little OT Chuck Norris, there. ;)

Friday, March 8, 2013

Gum Wrapper Chains

Growing up as a child of the nineties, I remember the first time I discovered gum wrapper chains. I thought they were SO. COOL. What I don't remember is how I learned how to make them - I'd love to attribute it to ingenuity, but maybe it was a step-by-step guide in my American Girl magazine. Let's just say it could have been either, ok? Giddy with my new skills, I made a loooooong chain of my favorite Wrigley's gum of the time (Juicy Fruit) which then proceeded to hang on my bulletin board until... wait, is it still there? Possibly. I initially wanted to make it into something 'functional' (like, you know, a necklace... that's functional, right?), but unfortunately that never happened. However, before you scoff and relegate gum wrapper chains to the wasteland of camp lanyards and friendship bracelets, you should know two things. One, the longest gum wrapper chain in the world is made of 1,688,930 wrappers (knowledge is power!), and two, I was able to incorporate this skill into the daily operations of the academic office where I work as a graduate assistant. Yes, it's that versatile.

Here's the story: A few months ago, my boss asked me to update our office's bulletin board in the main lobby of our building. He wanted it divided into three sections, but since I work in an academic building and not an elementary school, supplies like butcher paper (great for backdrops) and borders (self-explanatory) aren't really accessible. Which, in hindsight, might have been a good thing - this is a bulletin board in a college building, after all. I mulled over how I could divide the sections, and it came to me - the GUM WRAPPER CHAINS of my youth!

Our office has a pretty respectable supply of colorful paper for flyers and handouts and such, so I took three of the brighter colors to frame out the section titles, then mixed the two bordering colors of the adjacent sections in a gum-wrapper-chain-like manner. Check out the results:


Pretty simple, I know, but while I was making my paper chains, I had lots of people express curiosity about what I was doing, and it turns out, saying, "I'm making gum-wrapper chains," wasn't enough of an explanation. So, I figured I'd dedicate a post to explaining the how-to... which didn't go as well as I thought it would. Let me explain...

Step 1: What should have been "Buying Wrigley's Gum." However, it turned into "Asking Roommate to Pick Up Said Gum Since I Don't Go into Convenience Stores at Sketchy Gas Stations in PG County." Because she goes to Wawa on her way home sometimes, and I'm always at sketchy gas stations since they have the cheapest gas.

Step 2: What should have been "Separate the Foil Wrappers from the Paper Wrappers." Because remember how they used to have both? Remember that? Hold on to that memory, folks, because THEY DON'T DO IT ANYMORE! And haven't apparently, since 2010. I unwrapped my little pack of Doublemint, expecting to see what's pictured at below left, only to encounter the disappointing wrappers at below right. 

Double-Layered, Vintage Wrappers

Cheap, Sad Modern Wrappers


Step 3: Folding process - this actually came out okay, however, unbeknownst to me, I was setting myself up for failure here.

Blah, blah, blah, you get all these links!
Folding Lengthwise


Folding Widthwise (should be a word)


Step 4: What should have been "Linking Up the Chain," but, since the new wrappers are all weird, I forgot to tear them in half (you are supposed to separate the rather long paper wrapper of yore into two potential links), so they wouldn't fit into each other (you have to be able to slide one into another, leaving room for another one to then slide into that one). I actually have a sneaking suspicion that the new wrappers aren't the right dimensions - I re-did them by making extra lengthwise folds to make the links more long-and-narrow so that they have room to link into each other, and the results weren't ideal.

Showing where the links interlock, before realizing my error.
See? Something's off here...


So, in conclusion, I'm kinda over this whole gum wrapper chain thing made of actual gum wrappers. Here are more shots of my non-wrapper gum wrapper bulletin board chains to compensate.

...Aaah
Oooh...


However, if, for some reason, you still don't feel properly educated in the art of the gum wrapper chain, feel free to check out Gary Duschl's website (he's the guy who made the aforementioned record-breaking gum wrapper chain). His instructions are super clear and he's super nice (he writes that you should email him if you are struggling). So go, check it out, and soak up the aura of a dying art.

Friday, March 1, 2013

Button Art: Necklaces

When I was younger, I read a book about a character who collects buttons. She gathers bags and jars and drawers of buttons, so much so that others start to worry about her habit (more specifically, her older sister who shares a room with her, if I'm remembering correctly). One of the ways she attempts to downsize her collection is by making button necklaces for her friends, aaaaaaaaand I bet you can guess where I'm headed here.

This book, though a favorite of mine for a time, was long forgotten (to the point that I STILL can't recall its title, despite multiple Google searches) by the time I discovered the following items:

The brown and pink necklace (R) is from this Etsy shop, which still sells similar items (around $20 for a necklace).

I'm pretty sure the blue necklace (L) was also from an Etsy shop, but I can't remember which one (nor can I find it again - Google image search fail!).

At the time I found these images, I had recently come into possession of a variety of buttons from my grandmother's former button collection (mentioned in last week's post). When I saw these necklaces, I fell in love with the way they modernized the idea of button jewelry though color (modern mixes, monochromatic) and selection (basically, less is more - the entire necklace isn't button-blinged out). I immediately turned my attention to the buttons I had and began sorting. I found a few turquoise buttons to which I was pretty partial, and I decided to pair them with some chocolate brown buttons for a complementary palette. The pink/brown necklace above contains quite a few button shanks, which gave me the courage to try one in my own design. Since I only had a single variety of button shanks, I also mimicked the effect of layering buttons with contrasting colors in order to keep my necklace visually interesting.

Since I already had my buttons, I only needed to pick up a necklace chain (w/clasp) from Michaels, along with some jewelry wire. I wish I could remember what gauge wire I bought (I've since thrown away the packaging), because the first type I bought was too thin and didn't hold the button structure of the necklace at all. I would probably recommend 18-22 gauge, but maybe even thicker (which would be 16 and down). The picture to the left shows the two types, not a color preference (the choices were limited). I'm holding the better of the two - visually they are very similar, so it's more of a touch/manipulation differentiation (oh, and yeah, the number of the gauge, if you know it!). Once the wire issue was settled, I set to work 'threading' it through my buttons' holes and constructing my button conglomerate (for lack of a better term!).

Click to Enlarge
Once I was done constructing my button conglomerate, I attached it to my necklace chain. I used a pair of needle-nose pliers to break apart the chain, then I threaded the wire through the last link on each side and wrapped it off (you're definitely going to need a tool of some kind here). And be sure you tuck in the pointy ends of the wire once you've wrapped it off around itself, or you are in for some discomfort! For this necklace I simply broke apart the chain in the middle and inserted my button creation - luckily, mine was the kind of chain that can be clasped at multiple intersections, giving me some degree of flexibility regarding the end-result length of the necklace.

From the back it does NOT look pretty - but who cares?
And, here is my end result! The colors I chose helped alleviate any old-fashioned stigma, and I kept my layout down to seven button layerings. It is pretty lightweight, since most of the buttons are plastic. And the wire loops on either side are pretty unobtrusive. Fun, huh?