Thursday, January 24, 2013

Wedding Cross Stitch: Lovebirds

I hate going to weddings empty-handed. However, I am also a flat-broke graduate student, so my budget is pretty tight. Therefore, when faced with the conundrum of invitations to both a bridal shower and wedding (which has happened a few times), I have begun choosing the crafty gift route (in the dual sense of the term!).

Scenario: I was invited to my good friend's bridal shower this past summer, at which I gifted her (and her future husband!) with a few items from their registry at Bed, Bath, and Beyond. It was fun, and it felt good to give things I knew they wanted (I've watched enough sitcoms to know that you should always purchase from the registry!). However, I wasn't sure what to do when their wedding date drew near. Opinions on gift etiquette differ, but as I said before, I hate attending weddings empty-handed (though according to one commenter, that's actually not as thoughtful as mailing a gift - who knew?), and I really love this couple, so I wanted to bring something to their special day. In the past I've purchased two gifts from the registry in this situation, but that was back when S was for Salary, and not Stipend. ;) So, I decided to get crafty.

Original Pattern
Thoughtfulness and crafting often go hand-in-hand, and I wanted to make something simple and sweet to bless the home of this couple. I had stumbled upon this cute piece of cross stitch a few weeks earlier, although it was a little less-than-ideal in its original format (its accompanying cross stitched caption was an expletive against hipsters… yeah…), so this is the cropped version. And it's the only version I could find - there were absolutely no others, meaning I was at the mercy of blurry pixelation when I zoomed in on the silhouettes. So, I ended up guessing a bit while stitching, but in the end it all turned out okay.
My Replication - yes, I snuck my initials in!

I made sure to take really close-up pictures to nix the blurry blues if I ever use this pattern again. In retrospect, my perfectionist self might move the beak of the right bird up one square… but, to use my mom's term, it's 'handmade.' :) I used the couple's wedding colors to stitch their names and wedding-now-anniversary date, and it came together as a nice remembrance of their special day. Since I was unsure of their decor, I kept it small - no one wants a large, non-matching piece of craftiness hulking in the corner! :P Actually, since the wedding I've seen this little piece perched on a nightstand in their bedroom, which is pretty special. 

And there you have it, folks. A cute, creative way to celebrate the union of a godly couple.

Thursday, January 17, 2013

Card Booklets

The word “repurpose” is kind of a buzzword in the world of crafting. Basically, it means taking something that isn't useful and finding a new purpose for it, usually with some degree of elbow grease involved. I like the concept because it justifies tucking back odds and ends, "just in case," and I’m always saving bits of ribbon and cute containers for this reason. However, there are just some areas where I stubbornly resist the repurposing trend, one of which (ironically) being the easiest things in the world to repurpose: cards.

I’m a (minor) card-hoarder. It’s an overdose of sentiment, I know, and it’s not even limited to the cards containing sweet notes from dear friends. Often I’ll keep cards that merely have a brief salutation and signature, simply because I don’t want to ‘throw away’ that person’s gesture of friendship and goodwill. This results in a (slightly) bulky collection of cards that I store in pretty photo boxes from Michaels. It’s not (terribly) out of hand, but my organization system hasn’t been ideal – I kept cards from different events in separate Ziploc bags. Last week, however, I stumbled on this idea, and it seemed so simple and effective that I decided to give it a try!

These journals appear to have a bit more to them (dividers, pockets, etc.), but the base concept is great. All that I needed was my hole-puncher and book rings, which turned out to be one of those items that you see everywhere until you need to actually purchase some! I finally resorted to Staples, which usually means getting exactly what I want for a bit more than I was hoping to pay (I play this game with white-out tape – seriously, these are the best kind and they aren’t in Wal-Mart or Target!). After the hunt for book rings, I was all set to start making my card booklets. I first made four booklets for my Christmas cards (three years’ worth!) and recent birthday cards. 
 
 
For the sake of this post, I made a fourth booklet and took pictures of the assembly steps. I decided to tackle the cards and notes from my brother that I've saved over the past few years: 

Proof of Brotherly Love
Step 1: Ordering. I preferred my cards in order from smallest-to-largest, so I stacked them up according to size. I ran into an issue with some of the smaller notes, but I decided to tuck them into an envelope, which worked well.

See? Perfect fit.


Step 2: Spacing. I used the smallest card (for me, the top card) as a guide for spacing my binder rings. I tried to space them a bit farther apart in order to accommodate some of the larger cards in the stack. Unless you want to measure everything out, make sure you indent the holes from the card’s edge at a consistent length that is easy to replicate (I just pushed the card as far in to my hole-puncher as it would go). Otherwise you won’t have a straight alignment.


Step 3: Punching. Using the top card as a guide, I marked with a Sharpie the hole positions on the all the rest of the cards, then went back and hole-punched. Tip: Don't do too many of these in one night, or you can seriously bruise your palm!


Step 4: Binding and Covering. Once all the holes are punched, it's pretty easy to thread the book rings through. In terms of making a cover, I just used a textured piece of cardstock - you can definitely go to much greater lengths, as mine are pretty basic.

And there you have it, a card booklet! Really easy and practical.

(the cover is an inside joke)


And, bonus - it can be used to collate programs from performances! I always keep my Kennedy Center programs (in a condensed form - since most of the program is adverts, I pull out the relevant pages) and tickets - this is a neat way to store them, especially since I was able to use the program cover from WICKED as the booklet cover (I have some self-adhesive laminating sheets that I used).

Only one playbill cover matched the show I attended!

Thursday, January 10, 2013

BookMARKS from BookPAGES

I first discovered Etsy when I read The Hunger Games about three years ago. I geeked out over the tons of unique items created by readers – there were even handcrafted mockingjay pins and pendants (remember folks, this was before the third book was even published). At any rate, in my browsing I stumbled upon this idea and instantly fell in love:
Sadly, the Etsy shop that originally sold these bookmarks no longer exists - I had to scrounge around Pinterest to find the image. Additionally the user who created the stamp used for these bookmarks is actually 'on vacation' according to Etsy, so 0 for 2 there. However, the inspiration lives on!
At the time of my discovery, I was in my second year of teaching tenth and eleventh grade English. My school's curriculum included outside-of-class reading, so my students were all assigned a book each quarter that we discussed every few weeks, culminating in book analyses (the grading of which were the bane of my existence!). Anyway, I thought that this would be a great idea for an end-of-the-year present for my kids, using the apparent favorites of the past year. Winners for my tenth graders were A Raisin in the Sun by Lorraine Hansberry and The Lord of the Flies by William Golding; for my eleventh graders it was F. Scott Fitzgerald's The Great Gatsby and Mary Shelley's Frankenstein.
I kept my eye out for the next few weeks and picked up copies of each of these books from thrift stores and used bookshops. Sure, Amazon would have been easier, but I'm thrifty like that. ;) I’m also lucky, because my mom is a stamper, meaning I had a large collection of stamps to look over and choose from for embellishing the bookmarks. It was fun figuring out an iconic image for each book from the stamps available – Raisin was easy because my mom had a sunshine stamp. We also lucked out with LOTF, since she had a conch shell stamp (how PERFECT is that?). Gatsby and Frankenstein were a bit trickier, but I finally settled on an artsy portrait stamp that reminded me of the twenties for Gatsby and a stark outline of a tree for Frankenstein.

NOTE: These are pictures of leftover bookmarks, which is why I don't have a photo of any Raisin ones - they were all snapped up pretty quickly, as were the Frankenstein ones (only one left!).
My books’ pages were great – they had the title of the novel centered at the top of each page, which was a fun detail for the bookmark. I tried to choose pages that had keywords on them, like character names. Frankenstein was the best – gothic mood words abound in that book – every page had words like “tortured soul,” “gloom,” “dismal,” “terror,” etc. Loved it. :P The assembly steps were simple – chop the page down to size, round the corners (I have a pretty nifty corner rounder punch), add the stamp, laminate, and trim. I didn’t add the ribbon tassel to my bookmarks – too much hassle, and in my experience, tasseled bookmarks are the least practical; also, half of these were for teen boys, so I figured I doubled their odds of survival and potential use by nixing the tassels!
I did adhere a little note to the back of each before I laminated them, though. Yes, the majority of my kids were student athletes. ;) I laid the bookmarks out on a table in the back of the room and allowed students to go back and choose their own bookmarks based on their book preference. And there you have it, sweet, simple, English-y gifts that are easy to mass-produce, yet unique to each class and student.


Friday, January 4, 2013

Owl Pillows!

For my very first blog post, I'm going to talk about a project that I actually didn't do the lion's share of work on (nice, huh?). I am not a sewing person - don't let the cross stitching fool you. So, for this project, my mom was the driving force, although I did have full say in colors/fabrics and helped with the hand-stitching.
 
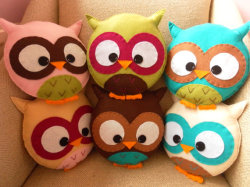
It all started with this picture that my mom printed out and tucked into a letter to me back in early December:
She found it on Pinterest, and after a bit of nosing around, I found out that it is actually from an Etsy shop. Since HollyGoBrightly is on 'vacation,' I didn't feel too bad when my mom suggested we try to recreate these cute little guys on our own. I had thought they were adorable when I first saw the picture, albeit a little college-dorm-room-ish. However, with a more sophisticated color palette (and an unexpected textured felt option), they fit right in with my trendy-modern (ok, IKEA) living room.

We decided to make three owls to go on the loveseat and chair in my apartment's living room, with colors that would coordinate with the existing sage green/cream/black-brown decor. So, off to Michaels we go!

We sifted through the variety of felts that Michaels had and discovered that they have a small selection of textured felts (pretty awesome, right?). Also during our search Mom convinced me to mix in a third color, and we loved the blue textured felt we found. Taking up pretty much the entire aisle, we selected and laid out our color choices (forgive the poor quality, my phone is old-school):
The light tan is textured as well as the blue - on the blue owl, we flipped the tan felt over so that it was smooth (we decided one textured piece per owl was enough). We also opted for cream eyes, the same color as the belly of the blue owl. Our next stop was the embroidery floss aisle, where we picked up thread to match each of our colors (light tan, dark brown, cream, black, orange [feet/beaks], green, and blue).
To give an idea of scale

Having not decided to attempt this blog yet, I took absolutely no pictures of the creating process besides the one above. A few tips, however:

Body: Mom created templates for each piece, making each body the size of a single piece of felt. Remember to make the ears a bit wider than expected, since they will narrow a bit in the hemming/stuffing process.

Eyes: We discovered that the eyes take up about a third of the owl and are placed at roughly the midpoint of the body (we had to resize our first eye pattern). Also, be sure to make the pupils 'look' down toward the nose, otherwise they come off startled and/or cross-eyed. The highlight in each pupil is created by a stitch of the cream thread in the process of attaching the entire eye to the body.

See the texture?

Feet and Beaks: The beaks are simply stitched across the top, allowing for a little flap. We hand-stitched the feet (mini-pillows themselves) and all the decorative elements to the top pieces, then Mom machine-stitched the pillows themselves, tucking the feet in after adding a little stuffing.

Any mistakes (like our little bellies... don't look too close, but they are a little off-centered!) we attributed to the owls being "handmade" - the perfectionist in me wasn't happy about that idea at first, but it was a lot of fun picking out the pieces with my mom and sitting with her, stitching and talking together. And now, for the price of felt and floss, I have three super-cute, 'handmade' owl pillows propped around my living room.