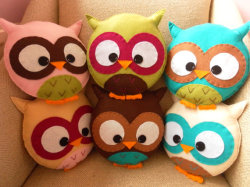
It all started with this picture that my mom printed out and tucked into a letter to me back in early December:
We decided to make three owls to go on the loveseat and chair in my apartment's living room, with colors that would coordinate with the existing sage green/cream/black-brown decor. So, off to Michaels we go!
We sifted through the variety of felts that Michaels had and discovered that they have a small selection of textured felts (pretty awesome, right?). Also during our search Mom convinced me to mix in a third color, and we loved the blue textured felt we found. Taking up pretty much the entire aisle, we selected and laid out our color choices (forgive the poor quality, my phone is old-school):
The light tan is textured as well as the blue - on the blue owl, we flipped the tan felt over so that it was smooth (we decided one textured piece per owl was enough). We also opted for cream eyes, the same color as the belly of the blue owl. Our next stop was the embroidery floss aisle, where we picked up thread to match each of our colors (light tan, dark brown, cream, black, orange [feet/beaks], green, and blue).
 |
| To give an idea of scale |
Having not decided to attempt this blog yet, I took absolutely no pictures of the creating process besides the one above. A few tips, however:
Eyes: We discovered that the eyes take up about a third of the owl and are placed at roughly the midpoint of the body (we had to resize our first eye pattern). Also, be sure to make the pupils 'look' down toward the nose, otherwise they come off startled and/or cross-eyed. The highlight in each pupil is created by a stitch of the cream thread in the process of attaching the entire eye to the body.
 |
| See the texture? |
Feet and Beaks: The beaks are simply stitched across the top, allowing for a little flap. We hand-stitched the feet (mini-pillows themselves) and all the decorative elements to the top pieces, then Mom machine-stitched the pillows themselves, tucking the feet in after adding a little stuffing.
Any mistakes (like our little bellies... don't look too close, but they are a little off-centered!) we attributed to the owls being "handmade" - the perfectionist in me wasn't happy about that idea at first, but it was a lot of fun picking out the pieces with my mom and sitting with her, stitching and talking together. And now, for the price of felt and floss, I have three super-cute, 'handmade' owl pillows propped around my living room.


