Wednesday, October 1, 2014

Pill Box (Remix)

A few weeks before Mother's Day this year I stumbled on a blog post detailing how to make this cute candy gift box out of an oversized pill box. I decided to make one for my mom (it's mail-friendly, which is a perk when you live out of state!), and while she liked it, I felt sort of like a child bringing home a macaroni necklace for her mom's birthday. Meh.

However, I really liked the concept, so I remixed it a few weeks later for a cute congrats gift for my brother, who had just finished up his last class for his MBA. He lives in DC, so a mail-friendly gift was just what I needed.


I kept the same ideas from the original, making a few little tweaks to fit my purposes. I used labels to cover both sides of the flip lids (to keep the large day-of-the-week letters from showing) and used Sharpies to write out a more appropriate greeting - "HOORAY!" - for the occasion.

I trimmed out colorful pieces of cardstock to fit inside each compartment (this idea was in the original craft), then decorated each one with a little congrats note.


 After they were all finished, I sprinkled them into the pill box:


 I then tucked a Riesen (T's favorite candy) inside each compartment - they were a perfect fit!


After snapping each lid shut, it was ready to go! The whole thing cost $2.00 - $1 for the pill box (from Dollar Tree) and $1 for a mini bag of Riesens (also from Dollar Tree). Everything else (labels, cardstock, Sharpies) I had on hand. Easy-peasy! 

Wednesday, September 24, 2014

Door Décor: Buckle Up, Cowboy!


I decided to challenge myself the other weekend. I thought the front door of W's new apartment looked rather bare, so I took it upon myself to make a door hanger that was manly (his stipulation). And... let's just say the front door is still bare, but the Texas pride shelf in the apartment has a new addition! Eh, I tried. :P

I'm pretty proud of myself for thinking this one up all on my own (aka I didn't find it on Pinterest, although I'm sure it's on there somewhere!). First off, I gathered a slew of belts in Texan colors - red, white, and blue - and a sturdy wooden frame (which was 99 cents!).


The belts were a steal - the gray tags were even discounted at half off!


Total cost for belts: $10.81 (the pink tag was 15% off)

I tested out my idea in the thrift store, so I knew I was coming home with the right amount of belts for what I wanted. After snipping off all the tags, I settled down to work.

I began by wrapping my first belt around the frame and securing it tightly on the back. I played around with the idea of having the belt buckles show but opted for a cleaner look by hiding them.


After wrapping and spacing both of my white belts, I moved to the reds.


To keep the extra lengths from flapping, I slipped a rubber band on each belt and fed the extra bit through until it was smooth and taut. Did this require me to unbuckle/rebuckle each belt? Yes, yes it did. Hindsight is 20/20. I could have trimmed and/or glued the leftover pieces, but I wasn't convinced that these belts' journeys would end as part of a door display, so I left them fully intact, just in case.


I purposefully aligned the buckles on the side opposite the blue in order to balance out the extra weight that came with wrapping two additional belts (three, if you count the star) around one end of the frame.


I linked the two blue belts together to form a single long one, then wrapped it around the left side three times, buckling and banding it in the back. The star was a bit trickier, and I ended up just knotting my final white belt into a rough star-like shape. I think it hints enough at the real thing. :P


I tied a length of suede cord to each top corner, and voilà! There you have it! A manly Texan door hanger shelf adornment for my, well, manly Texan. ;)

Monday, June 23, 2014

Door Décor: Patriotism and Paper Rolls

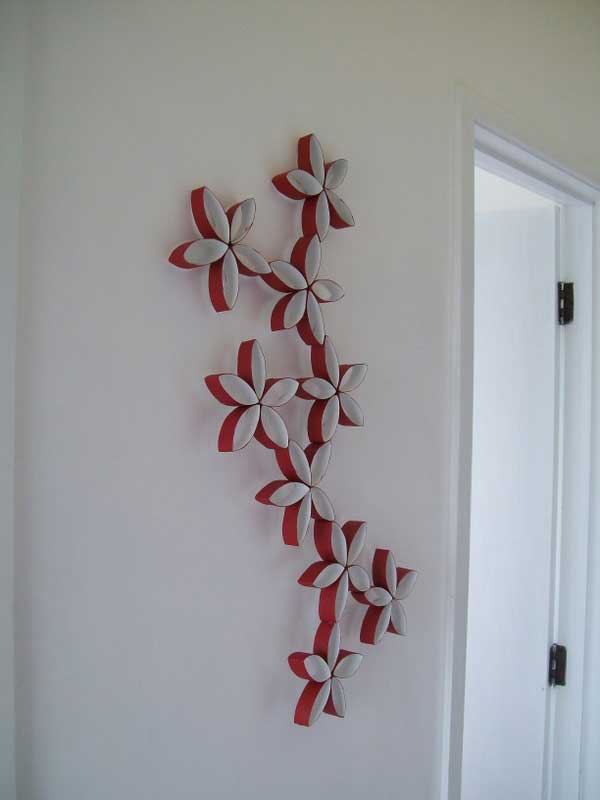
A popular trend that I've been seeing online lately is that of toilet paper roll wall art. No lie. These creations are awesome, and they're made of re-purposed toilet paper rolls.

Wrought Iron
Flowers
Wreaths

Inspired by the above right image, I decided to craft my own toilet paper roll art for my poor bare front door (I took down my winter sunburst a few weeks ago and haven't had time to make a replacement). I knew I wanted something red, white, and blue, since July 4th is right around the corner. So, I set about collecting my supplies (I ended up using three toilet paper rolls and one paper towel roll) and getting to work.

Step One: Painting! I decided to make five flowers, so I painted my three toilet paper rolls (one per flower) red and my paper towel roll blue (out of which I'd make two blue flowers). Luckily I already had red and blue paints on hand, leftover from this craft.


Step Two: Cutting! After the paint dried, it was time to slice it up! A few sites recommended using an X-Acto knife and a cutting board, after meticulously measuring and tracing lines... I used a ruler, marked out sections 3/4" wide down one side of each tube, then sliced them apart using my trusty old scissors. ;)


Step Three: Gluing! It definitely would have been faster to use my hot-glue gun to attach my segments together, but since I was going to be hanging my creation on my front door in June, I knew it would all melt off. I opted for Tacky Glue, which I had on hand, and which will hopefully hold up to the baking sun. *fingers crossed*

I first attached the 'petals' together in sets of two.
After drying all day, I added my third 'petals' into the mix to dry overnight.
The next morning I was ready to combine my sections...
...into a complete flower!

After all my individual flowers dried, I then started laying them out in a variety of patterns until I figured out my final design. I then glued-and-waited one last time (overnight), and the following morning I had my door décor!

I was so glad I had these mini-clothespins (leftover from my 2013 birthday bash) in my craft supplies -
they were super handy for this project!

While I originally liked a vertical layout, I realized it
needed to be horizontal to accommodate my storm door.
There's a better, unobstructed view. :) Also, please ignore
the blurred out apartment numbers - privacy, yo!


Sorry for the blinding-sun vibe on that last pic - the colors of the flowers really weren't coming across in the photo, so I lightened it. I think I'd advise painting the inside of the 'petals' so as to really make the colors pop (maybe a touch-up for next year, if they weather the next few months!). Spray-painting would be an easier route in that case, I'm sure. At any rate, I'm pleased with it and glad to try a new craft that didn't cost a cent (I used a bit of on-hand jewelry wire to hang it)! And, since I am heading off on a grand adventure to Texas tomorrow (by way of L-ville and a certain Texan man of mine), it'll certainly do. ;)

Tuesday, June 17, 2014

Sweet Treats: Miniature Turtles

Has anyone ever tried to make the little snacks that consist of a pretzel, a Hershey kiss, and an M&M? Has it failed miserably for you? Me, too. And, you're not alone. I have the worst luck with making that (seemingly) simple treat - the kisses never melt right for me. A friend once told me that the chemical makeup of Hershey kisses causes them to harden if you bake them too long, which is exactly what happened as I kept baking mine longer and longer in an attempt to reach the 'shiny, semi-melted' state. I never achieved that state.

However, there is a MUCH easier, and in my opinion, MUCH better variation out there - the miniature turtle. While they are a bit pricier (due to the pecans), it's worth it. When you end up throwing away what is roughly the equivalent of an entire bag of Hershey kisses in the wake of failure, shelling out a bit more for pecans ain't so bad. ;)

Recipe (adapted from the Rolo site):

Small pretzels (I used Butter Snaps, because I can never find the wagon-wheel types)
1 bag of Rolos (this is usually the basis for how many treats I make)
Pecan halves

Heat oven to 350°F. Lay out pretzels on a baking sheet covered with parchment paper (Kroger makes these awesome pre-cut sheets). Top each pretzel with an unwrapped Rolo. Bake 3-5 minutes until the Rolos begin to soften - remove from oven and press a pecan half onto each Rolo while they are still warm. Cool completely (at room temperature or in fridge)... or eat 'em while they're still warm!


These are super easy and, so far, foolproof. I whipped up a batch of these for my coworkers at the end of the school year since I'd been lagging in the department potlucks we'd had (forgot about one, brought juice to another). After letting my mini turtles chill in the fridge overnight, I loaded them into a fun container and left them in the teacher's lounge for everyone to enjoy. I opted for a reference to Aesop's fable rather than making a comment on how slowly the year crawled by. ;)

Wednesday, June 11, 2014

Birthday Cross Stitch: Gymnast

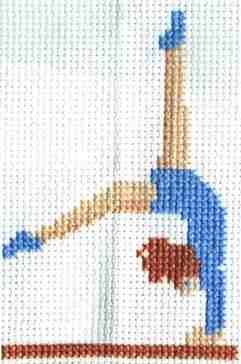
My friend's daughter is an avid gymnast (yes, we've watched The Gabby Douglas Story together), so for her birthday this past fall, I stitched her this sweet little gymnast.  ------------------------------------------------->

I found the pattern on this website (same one where I found the castle pattern I used in this project). The direct link for the pattern can be found here. I like trolling free patterns online every so often and saving ones I think are cute, even if I don't have a specific use for them yet.

The original pattern resulted in the image at left, but I rarely follow the prescribed colors of cross stitch patterns, preferring my own 'floss palette' (which is usually based on colors I already have on hand, lol, but personalization also comes into play). I selected the hair and skin tone colors from my floss collection, aligning them with Claire's coloring as best I could. I also decided to remove the shoes, since the girls at her gym compete barefoot (I've been to a meet!). For the leo, I used teal, which is (was?) C's favorite color. I free-stitched her name in the remaining white space to really personalize it and tucked it into a fun frame that I found at Wal-Mart.

It came together really nicely, and she definitely liked it. 
And, I know for a fact that it's displayed in her bedroom upstairs, so there's the proof. ;)

The fabric isn't wrinkled - I always catch reflections in the frame glass!

Friday, June 6, 2014

Scavenging for Gold(ing)

One of my sophomores' favorite activities this past year was a scavenger hunt that I planned in conjunction with The Lord of the Flies. Students were divided into groups and given lists of items that corresponded with Golding's novel.

Their lists read:
  • Something fair-colored for Ralph
  • A rock that reminds you of Roger
  • A leaf that reminds you of Simon
  • Something identical for Samneric
  • An item that reminds you of Piggy
  • Something sharp for Jack
  • An item that has a scar on it
  • An item that could be used to make fire
  • A "beastie" - no live things, please!
  • A flower to represent the island's beauty
We went outside during each period (even though it was a slightly chilly/overcast day - but no turning back!) and groups set off with their lists and brown paper bags (an easy way to moderate the size of the items they collected).

and flowers, oh my!
Rocks,

and sticks,


It was a lesson that definitely required some prep-and-planning time, but I'm sure it's one my students will remember. We all had a good time hearing different groups present their findings - there were some repeats, but even those provided good discussion points. I ended up taking pictures of what the groups collected and created a Powerpoint to share with them (different periods had different ideas, and one period missed the activity entirely due to a career fair... yup, thanks for the heads up, Office People... not). It was fun and a pseudo-review activity, as students sought to make sense of each group's item choices. Here are some of my faves:

Straw = Ralph's "Fair" Hair

Items for Piggy - The striped rock was "unique and different,
like Piggy" and the TruMoo milk has a... farm animal
connection, I think? Haha


All of the "sharp" things for Jack - thorns, a broken pencil, a nail,
some sort of metal stake, various sticks, a pointy rock, and a shard of plastic.
Leaves for Simon - a dead one (yeah, spoiler alert!) and an 'unlucky' and 'odd' three-leaf clover
that only has one leaf (they definitely plucked off the other two, lol)
All of their "beasties" - a few things that look like snakes, a 'caterpillar,' the bear on the Kodiak tin (*eye roll*),
and a few other items that had less-compelling rationales (one was literally described as "pea-pod thing").
My favorite items with scars. A lot of students ripped holes in leaves,
which made me wonder about their understanding of the term "scar." :P
The most ironic items - huge rocks that represented either Roger (rock) or Piggy (huge).
Get the irony? Get it? Major bonus points if so! :)

After the groups presented (and left for the day) I threw away most of the items (so many dead flowers and leaves!) and had a few students return the large rocks to their natural habitats, so I was glad for the photos. It was definitely a fun, creative activity that I hope made my sophomores' LOTF experience the slightest bit more enjoyable. ;)