Tuesday, April 22, 2014

Paper Chain Countdown


A few months ago, a chain made out of construction paper appeared in the teacher's lounge. It had alternating links of red and white (our school colors) and while it did lend an air of festivity to the place, I wondered aloud why it was there. Another teacher informed me that the art teachers had made it for a teacher who was retiring this year. Each link represents a day he has left, and at the end of every day he breaks one off. I must say, it's been fun watching that chain shrink these past weeks (c'mon summa time!), so when my mom, who is also a teacher, confided to me her shared eagerness for the approaching summer, I decided to make a little countdown chain for her to enjoy as well!

-o-o-o-o-o-o-o-o-o-o-o-o-o-o-o-o-o-o-o-o-o-o-o-o-o-o-o-o-o-o-o-o-o-o-o-o-o-o-o-o-o-o-o-o-o-o-o-o-

For my links, I selected a cheery yellow cardstock and selections from Sense and Sensibility - quite the combo, I know. ;) I wanted the chain to be travel-sized, since I was mailing it to her, so I made the links as small as I could (using my stapler as a guide).


After creating my chain of 29 links (the number of schooldays she has left!), I added a little clarifying tag to the chain's end. And yes, I'm the kind of person who purchases green staples. Because I can.


Luckily, I had the perfect-sized box to package my chain. After lining it with tissue paper, I coiled up the chain and nestled it inside. I tucked in a little note as well (Mary Call is a little inside joke, as I've previously mentioned). It's set to arrive this week (during which she's on Spring Break, conveniently, so I could safely settle on my number of chain links). It was such an easy craft, and I hope it offers her encouragement in the days to come!

Thursday, April 17, 2014

Easter Treat Repeat

I whipped up some Easter treats for a few coworkers this year - they might look a little familiar, as they bear a striking resemblance to these little treat boxes that I made for friends last year. ;) I scored these cute little candy holders at Target around this time last spring - I lined them with some tissue paper, filled them with jelly beans, and tucked in a little handmade sign that is simultaneously cheesy ("hoppy Easter!") and literary (I cut out the bunny silhouettes from a copy of Sense and Sensibility). 


There in the ground His body lay
Light of the world by darkness slain:
Then bursting forth in glorious Day
Up from the grave he rose again! (more)

Tuesday, April 1, 2014

Paper Medallions, Take Two

Paper medallions... such easy, cost-effective decorations! They are often used for parties (like mine!), but I decided they would be the perfect touch to my bathroom décor! As you can see, after my initial round of decorating, I still had a blank wall space left above my toilet that needed filling:

Pic from this previous post

So, I hit up Michaels one weekend and selected sheets of cardstock that coordinated with my shower curtain colors.

The tan was really the back of the gold (sticking out at the bottom)!

I also picked up a picture frame from Wal-Mart as a base for my medallion art. I wanted to thrift for one, but I didn't have time before that week's snowstorm hit (didn't it feel like they were weekly this winter??).

Original Frame
Frame with Glass and Backing Popped Out


Following steps similar to these, I scored, folded, and glued the cardstock into medallions of various sizes, which I laid out in a pattern on my frame. I wrapped it with a lightweight wire that I nabbed for cheap at Michaels after Christmas (it's a merry green, but since it isn't visible behind the medallions, it still works). This gave me a gluing base for the medallions.

... then I wrapped the wire.
I started by laying out the design...


I used leftover scraps to ensure a solid hold and simply built it medallion-by-medallion - here's a set of front/back pics of the finished product:

Back, showing attachments
Front, all finished!


After attaching the medallions to the wire and molding it into shape, I affixed my new creation to the bathroom wall and ta-da! Beautiful. :P

Showing the matching sink/wall accents.
So much better than before! And it
matches better than the photo shows.

Sunday, March 16, 2014

Comin' in for a Landing (Strip)

With all the snow days we had these past two months, I was able to finish off a few sections of my apartment that I hadn't had time to work on since starting school. One of these was the little landing strip next to the front door of my apartment. I had a similar setup in my former apartment - I really like the IKEA shelf with brackets look, apparently.

Former Apartment (details)
Current Apartment


 Those who read my original apartment decorating post will notice the two new wall decorations above my little shelf. The Keep Calm sign is a Christmas gift from my parents - my dad found it at one of my favorite craft stores - Hobby Lobby. The little bulletin board is one I picked up in Big Lots for $3.00 and decorated myself. I knew that I wanted to spruce it up some, but I wasn't sure what angle to take. Stamping? Fabric?

Since I wanted it to match the Keep Calm sign, I eventually selected the airmail border as my inspiration, which would give it a nice vintagy-old world feel. I also liked the connection to international mail, since it makes me think of my friends overseas. Having seen others do a similar sort of design on bulletin boards (chevron stripes), I figured I'd pick up a few bottles of craft paint from my local Wal-Mart along with some masking tape and set to work!

Step One: Gather supplies!


Step Two: Outline border space and stripes. I decided to forgo the white stripes, opting to leave those spaces empty (and a little smaller).


Step Three: Paint! I counted/marked out the alternating colors ahead of time - luckily it all spaced out right (I'm not that talented!).


Step Four: Remove tape! I left it to dry for a few hours, but then I was impatient to see whether or not the paint had bled under the tape (my backup plan was to cover the board in fabric if the paint had bled!). Luckily, it worked perfectly!


Step Five: Embellish! I used a stamp that I had picked up at Michaels on sale a few months ago to really seal the deal on the airmail vibe.


 I wanted something to balance out the stamps on the right corner, but I didn't have any other rubber stamps that would work. So, I made my own stamp out of a mini jam jar I use to hold safety pins. It worked great, and after a little bit of online research for inspiration, I filled it in with text (Kandern is the name of a little German village I've visited three times for English Camp). Another nod to my international friends. :) And there you have it, my favorite little spot to pile junk mail and overdue library materials. :P

Saturday, March 8, 2014

Remixed Boot Tray

One of my brother's Christmas gifts this year was a boot tray, a handy little thing that serves as a catch-all for sloppy, snowy, wet boots. Before this winter, I would have never thought I needed such an item, but thanks to the massive amount of snow/ice we've had these past few months, I've realized it was an imperative addition for my apartment entryway.

My Inspiration
While my brother's tray is nice, it's a bit of an eyesore - since my entryway is part of the same space as my living room (and kitchen), I wanted it to add to the décor of the room. I found this idea on Apartment Therapy and fell in love. The original poster used a LADIS lid from IKEA as her tray base, but unfortunately, IKEA no longer sells that type of container. I searched high and low during my last visit, only to be met with disappointment. *sigh* So, onto Plan B.


Once I confirmed that it
wasn't super-valuable, I
colored over it's original
gold eyes with a brown
Sharpie, turning them a nice
(and more updated) bronze.
I searched and searched for a suitable black plastic lid at various stores but kept striking out. I also perused trays, but those were often too expensive (the LADIS lid was $3.00) or too cute to be used to hold dirty boots (like this one, from IKEA). My mom also pointed out how small my available space was - opening my front door leaves an area of about 11" between door and wall. I had my work cut out for me. Enter Ohio Thrift, a locally-based thrift store chain that I recently discovered while visiting friends. Needing a little bit of a pick-me-up after dropping my mom off at the airport the other week, I found myself browsing the aisles, sizing up items and scavenging shelves. I had a good feeling, since during my last visit I scored this little fellow (right) for $1.99! In the midst of my wandering, I found a few contenders for my boot tray, but they were all discarded when I found a deeper black wooden tray for $2.99. I sized it up in the store but hung onto the receipt, just in case I needed to return it for another option later. Luckily, I didn't need to! I brought it home, cleaned it up, and filled it with four bags of black river rocks from Dollar Tree. End result? Awesome functionality.


My mini entryway - the door passes
right over the tray without catching.
Also, please note the mini snow shovel,
bag of kitty litter, and ice scraper.
My Version!
Yes, these shoes are props. ;)

Sunday, March 2, 2014

The Great Cover-Up

... with curtains! I realized that I never posted an update about my curtainless (but frosted!) living room windows, so, without further ado, ta-da!


 Don't get too excited - they're from Family Dollar. Or Dollar General. I had all these grand plans of making a window cornice, even finding this great tutorial... but, I hit a decorating wall (coupled with an onslaught of schoolwork - lesson-planning, grading, reading ahead, oh my!). So I wimped out and purchased a few light-colored curtains from the dollar store. Not the best quality, but they look pretty good up there, and they offer a nice neutral framing for the windows (as well as hiding the glaring holes left behind by the removal of whatever hardware had been there in the past). Because the windows are adjacent to each other, I opted for one long rod to thread both curtains on. Initially, it bowed in the middle (doh!), but I quickly solved that with a well-placed screw hook. It blends right in when the curtains are pulled together. WIN. Also, the top picture below shows more of the true color of the curtains - they are a light cream color (not yellow).


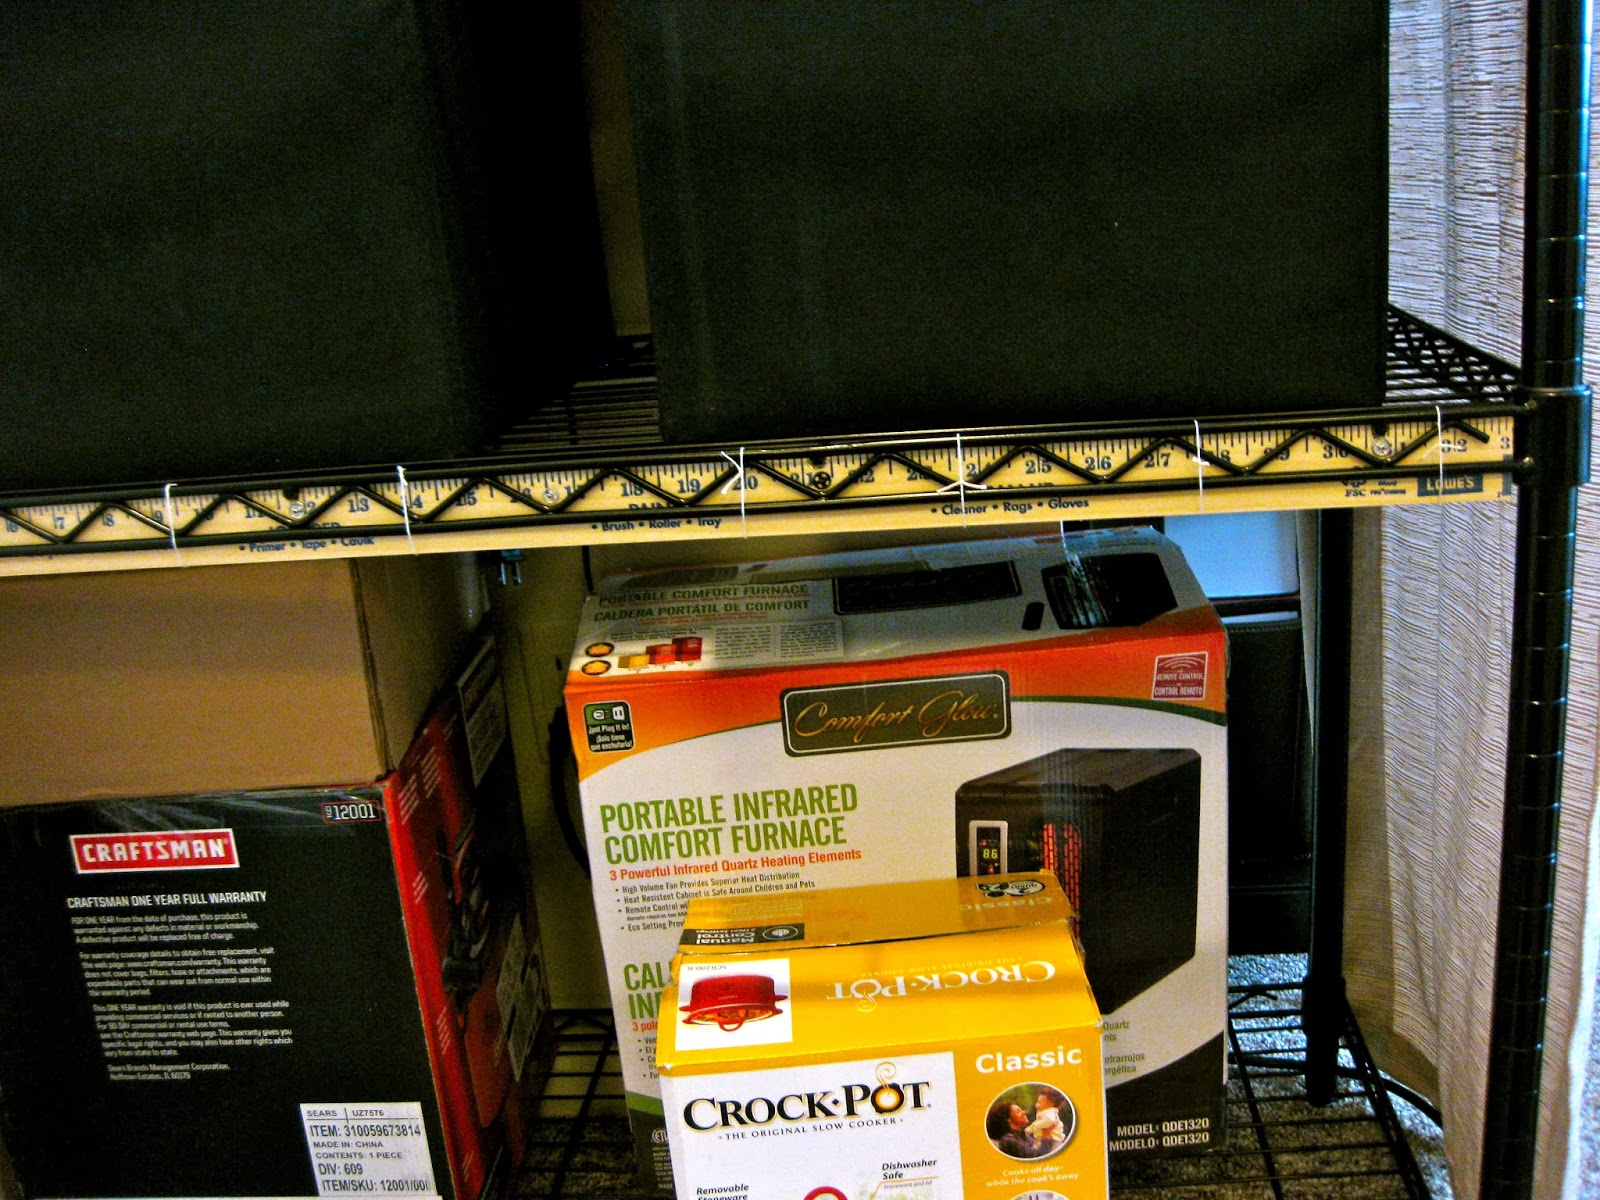
Another place that received a curtain upgrade was the wire shelving unit that I use as pantry/storage overflow (you might remember it from my original new apartment post). I purchased a window panel from the dollar store (high class around here, folks) and trimmed it down to size, using the hot-glue hemming method. I wanted the shelf to blend into the wall more, so I picked a neutral shade. To attach, I just split the hang-loops and tied them off on the top wire shelf. However, there was still a glaring problem:


Yeah, everything was just hanging out on the bottom rack (mostly empty boxes for storing items). Luckily, I had leftover fabric from the side curtain, but it wasn't enough for a single-paneled curtain of that size. So, I decided to make three smaller ones instead! Since I wanted a smoother look at the bottom, tying them off wasn't an option. So I devised a plan involving snaps, a yardstick, and felt.

Add caption
Add caption
After measuring, I drilled out a few notches in the yardstick to ensure a snug fit (there were wire rungs in the way of making it flush). After adhering snaps, I used twine to attach the yardstick to the shelf (zip-ties probably would have been better, in hindsight).


Then after some more measuring and cutting, gluing and the tiniest bit of sewing, I snapped my panels into place! Dontcha love how I gloss over the tedious parts? ;)

Snapping it on!

Two on, one to go!

Finished effect - looks more like pleats than separate curtains.
Also, they need ironing, I'm aware.

And, here you have it! The finished product! Much nicer, don't ya think?

Monday, February 3, 2014

Door Décor: Winter Sunburst


Since taking down all my Christmas decorations, my front door has been a stark, sad site. I knew I wanted to buy/make something winter-y to put up there, but I just couldn't figure out what to do. Many ideas I found and liked seemed a bit Christmas-y (you really can't get away with decorating with anything evergreen out of season), and the others seemed to involve hanging a pair of ice skates from a wreath. Don't get me wrong, that's certainly winter-y, but it's also slightly expensive (do all these people just have vintage pairs of skates lying around? Because a pair from eBay seems to run anywhere from $15 to $30, plus shipping). Yeesh. Also, ice skates seemed a bit clunky to store in the off-season (and space is premium at my little semi-studio).

Pinterest gem!
Thankfully, I kept up the search and turned up this little gem on Pinterest. The directions (found on some versions of this pin) were ridiculously oversimplified pictures, the hallmark of a future Pinterest fail, but then a little more digging turned up the original source for the craft - a legitimate craft blog with complete directions and everything! With the assurance that this was a realistic craft, I began gathering my own supplies in earnest. This mainly involved scouring the yard in front of my apartment building for branches and twigs - but I had to wait for the plethora of snow to melt first! I was also glad that the trees around my apartment have a darker-colored bark than the willow twigs pictured, since I have a white door. After breaking down the branches and twigs into usable pieces, I went to my local Wal-Mart for jute twine... and couldn't find any! So, I decided to use what I had on hand, which was plain old twine. I wasn't sure how it would turn out at first, but after wrapping it around a cardboard ring that I cut out (following the blog instructions), it turned out pretty well.
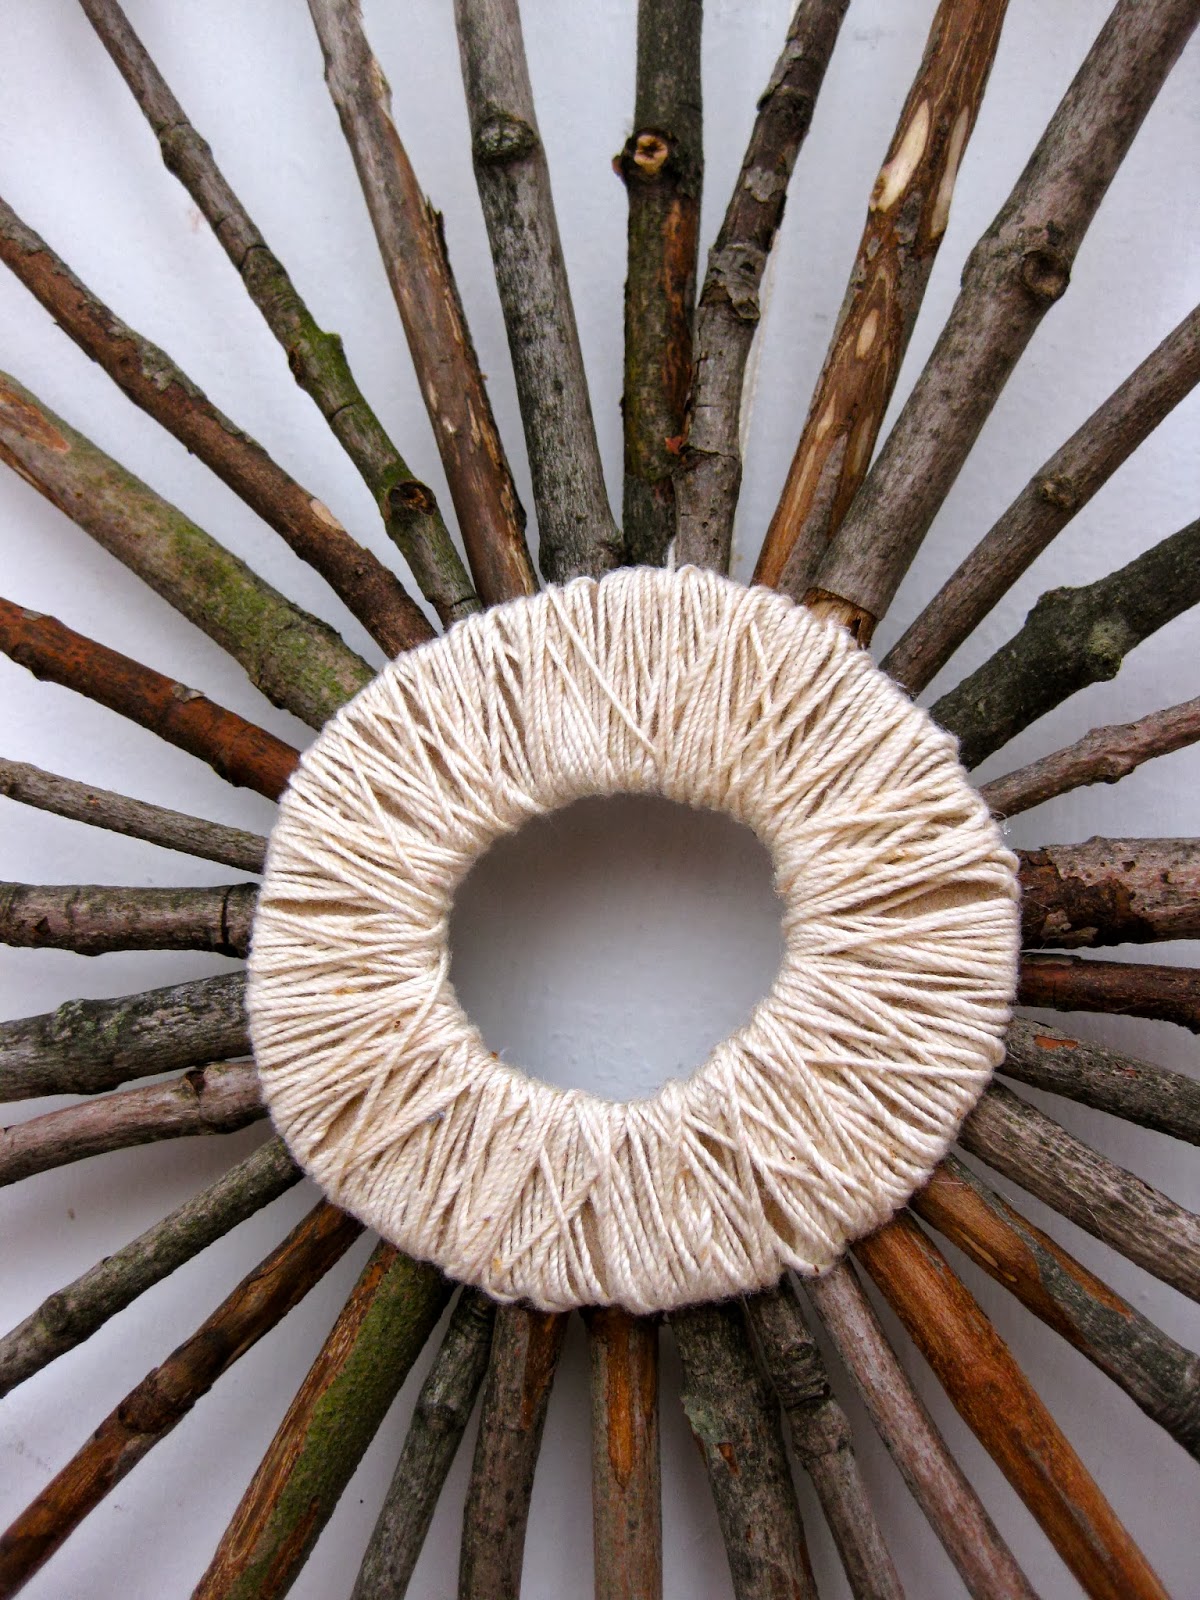
 I ended up estimating the amount of twine I would need, then cutting it from the spool (in order to loop it around the ring). To keep it from tangling, I wrapped it around a clothespin, using it like a needle, if that makes sense. Originally, I had made some paper blossoms out of book pages to adorn my sunburst (following the directions from this site), but I felt that the look was a little cluttered once the twine-wrapped ring was completed. The pics below show what I mean (sorry for the bad quality - night-crafting strikes again!). The left photo was more of a concept shot, before adding the ring and another round of twigs.

The roses are so cute...
... but I just felt that they hindered the clean
lines of the finished sunburst.


 The construction was simple, once my ring was prepped - I simply hot-glued the twigs in sets (four, then eight more, then sixteen) to ensure even spacing and balance in the finished product. I love the random, messy look of the example one, but I seriously doubt I could achieve the same. And, let's face it, I'm meticulous. :P I contemplated leaving the ring in the back like the original picture showed, but I liked the look of the wrapped ring. Good thing, too, since the hot glue looked a hot mess when I was done! I kind of took liberties knowing it would be hidden - and maybe it shows. But nobody will see! Except people reading this...


A quick note on hot glue - if you have a door that gets direct sunlight and tends to cook your door hangings, the glue is probably going to melt. My door barely gets sun (and most winter days in OH seem to be overcast), so I'm not too worried. All in all, once the twigs were gathered, it was an easy evening project, and I love how it turned out! Wintery, natural, and still mod-chic - sunbursts are so popular at the moment! Happy Winter, everyone (we have ANOTHER snow day today... bye, bye Spring Break)!