Showing posts with label sewing. Show all posts

Friday, February 22, 2013

Button Art: Framed Designs

Growing up, I always liked sorting through my mom's buttons - sifting through little piles of color, selecting my favorites. I also remember reading a book about a certain bear who embarks on an epic mission to find a certain missing button (aw, yeah, remember Corduroy?). Unfortunately, as a teenager I rebuffed my mom's attempts to teach me the art of sewing, so my affinity for buttons remained a stifled interest until I recently began to discover other decorative uses for them. And, in a sense, this is a return to the historical use of the button. Don't believe me? Check it! According to Ian McNeil (cited by Wikipedia), "The button, in fact, was originally used more as an ornament than as a fastening, the earliest known being found at Mohenjo-daro in the Indus Valley. It is made of a curved shell and about 5000 years old."

So, who says that such ornaments have to stay in the realm of fashion? Not I! While it's true that buttons are made to be sewn, fabric ≠ clothing. Check out some of my hopeful future DIYs:


<--- This pillow with button leaves is from Etsy (click to enlarge).

This amazing monogram (made with a burlap canvas) is also an Etsy find. --->


I don't know where I curated this image from, but I really liked the combo of fabric backings and buttons.

Back Story: A few years ago we lost my grandmother, and while sorting through her personal effects, my mom and I discovered a large coffee can brimming with her button collection. Seeing the cascades of buttons, I knew I wanted to use some in crafts that would get them out of their coffee can and into the open. I began searching around online and was struck by a few of the images above, so I decided to try my hand at creating my own framed button design with my grandma's buttons.

Reproduction! But you get the idea.
The color scheme of my bedroom is navy blue, cream, tan, and a light mint green (think nautical, without the lighthouses). I might go into further detail in a later post, but what's pertinent for now is that I found a nice variety of blue buttons in my grandmother's collection (I also nosed around my mom's as well - hey, my button collection consists of the extras that come with nice sweaters and button-downs, so it's itty bitty). Once I sorted out the colors that went with my palette, I had to settle on a design. It's important to find a design that's detailed enough to be read from a distance, yet simple enough that it can be created with little circles. I eventually settled on a fleur de lis and played around until I found a button layout that worked. I used cross stitch fabric (aida cloth) and pencil-marked each button's position on the fabric before simply sewing them on individually. I didn't take any pictures of the process at the time, but at right is a rendering of what it looked like. Once the buttons were sewn on, I trimmed down the fabric and centered the design in an 8"x10" frame (disregarding the glass). And I think it turned out pretty well - I added a lone cream button and a few brown buttons from my mom's collection into the mix to give it a little more color variation, and I think it fits nicely with the rest of the wall hangings.


Since the fleur de lis is a symmetrical design, I wanted to map it out on the cloth ahead of time. However, when I took some of my grandma's maroon/pink and cream buttons and made a little heart design for my mom, I was able to be much more flexible. Basically, all I did was arrange the buttons in the design I wanted and took a picture of it:


Then I simply used the picture as a guideline for attaching the buttons to my aida cloth. I tucked the finished design in a little frame (probably a 3"x4"?), and the result was a sweet reminder of my grandma (with a little bit of me mixed in) for my mom to keep on her desk:


So, if you have some buttons that have sentimental value (or you simply find them fascinating), but you aren't a seamstress, don't fret - there are all sorts of creative ways to incorporate them into your modern (read: not country-chic) decor!

Friday, January 4, 2013

Owl Pillows!

For my very first blog post, I'm going to talk about a project that I actually didn't do the lion's share of work on (nice, huh?). I am not a sewing person - don't let the cross stitching fool you. So, for this project, my mom was the driving force, although I did have full say in colors/fabrics and helped with the hand-stitching.
 
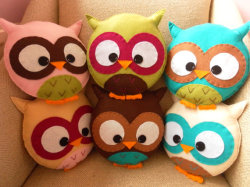
It all started with this picture that my mom printed out and tucked into a letter to me back in early December:
She found it on Pinterest, and after a bit of nosing around, I found out that it is actually from an Etsy shop. Since HollyGoBrightly is on 'vacation,' I didn't feel too bad when my mom suggested we try to recreate these cute little guys on our own. I had thought they were adorable when I first saw the picture, albeit a little college-dorm-room-ish. However, with a more sophisticated color palette (and an unexpected textured felt option), they fit right in with my trendy-modern (ok, IKEA) living room.

We decided to make three owls to go on the loveseat and chair in my apartment's living room, with colors that would coordinate with the existing sage green/cream/black-brown decor. So, off to Michaels we go!

We sifted through the variety of felts that Michaels had and discovered that they have a small selection of textured felts (pretty awesome, right?). Also during our search Mom convinced me to mix in a third color, and we loved the blue textured felt we found. Taking up pretty much the entire aisle, we selected and laid out our color choices (forgive the poor quality, my phone is old-school):
The light tan is textured as well as the blue - on the blue owl, we flipped the tan felt over so that it was smooth (we decided one textured piece per owl was enough). We also opted for cream eyes, the same color as the belly of the blue owl. Our next stop was the embroidery floss aisle, where we picked up thread to match each of our colors (light tan, dark brown, cream, black, orange [feet/beaks], green, and blue).
To give an idea of scale

Having not decided to attempt this blog yet, I took absolutely no pictures of the creating process besides the one above. A few tips, however:

Body: Mom created templates for each piece, making each body the size of a single piece of felt. Remember to make the ears a bit wider than expected, since they will narrow a bit in the hemming/stuffing process.

Eyes: We discovered that the eyes take up about a third of the owl and are placed at roughly the midpoint of the body (we had to resize our first eye pattern). Also, be sure to make the pupils 'look' down toward the nose, otherwise they come off startled and/or cross-eyed. The highlight in each pupil is created by a stitch of the cream thread in the process of attaching the entire eye to the body.

See the texture?

Feet and Beaks: The beaks are simply stitched across the top, allowing for a little flap. We hand-stitched the feet (mini-pillows themselves) and all the decorative elements to the top pieces, then Mom machine-stitched the pillows themselves, tucking the feet in after adding a little stuffing.

Any mistakes (like our little bellies... don't look too close, but they are a little off-centered!) we attributed to the owls being "handmade" - the perfectionist in me wasn't happy about that idea at first, but it was a lot of fun picking out the pieces with my mom and sitting with her, stitching and talking together. And now, for the price of felt and floss, I have three super-cute, 'handmade' owl pillows propped around my living room.