Showing posts with label twine. Show all posts

Tuesday, April 29, 2014

QR Coasters

A few weeks ago I had the privilege of visiting my boyfriend's bachelor pad for the first time. Among other things, there was a notable lack of coasters for his freshly-purchased (and newly constructed with the help of yours truly) IKEA coffee table. Since W is well-aware of my crafty tendencies, he made an offhand comment that I could "make some crafty ones." I tucked that little statement away, mulled it over, and came up with an idea that manifested itself as these:


But let me start from the beginning. As you might be aware, one of my favorite crafting pastimes is cross-stitching (proof, more proof, even more proof). While cross stitch isn't always the most manliest of things (I'm thinking of the samplers of yore), I'd already experienced success with cross-stitching QR code magnets for friends' Facebook pages in the past, which made me think that such an approach would work for coasters as well.

I followed similar steps to those outlined in the blog post above, using a free QR code generator (like this one) to turn my web addresses into QR codes, which then function as ready-made cross stitching templates, thanks to the beauty of pixelation. What web addresses did I use, you ask? Well, I knew I wanted to create a set of four coasters, and I knew I didn't want to cross stitch the same pattern four times. So, I decided to do a series. For the sake of consistency, I elected to use Wikipedia sites for the basis of all my codes, varying the content to reflect my boyfriend's interests. Since I'm dating a Texan, the first one had to be the Alamo, with Hank Williams coming in as a close second. :P Since I also happen to be dating a former seminary boy, G.K. Chesterton has made it into quite a few of our conversations, and therefore into the coaster series. And since the best presents include inside jokes, the last one was for Yorkies. ;)

I also wanted to deviate some from the typical black-and-white QR color scheme, and since W is a proud Aggie, I settled on using Texas A&M colors (which are technically maroon and white, but I mixed in the black) for my coasters.


I varied the color-mixing across the codes, experimenting with different layouts. I grew more confident in my integration skills as I went along, but I'm not going to lie and say I didn't have to go back and rework a few places where I had gotten off-track. ;)


After completing the stitching, my next step was turning these bad boys into coasters. I had originally purchased cork squares from Michaels to use, but I wasn't sure how to make them work. Then I stumbled on these babies at Target. Their little rimmed edges seemed perfect for my project, especially since I wasn't sure how to keep the edges of my Aida cloth from unraveling. I had already picked up a bottle of spray adhesive at Michaels, so I was prepped and ready to go!


I made a template (using junk mail!) to aid in trimming out my codes to fit inside the coaster rims. Once all four codes were trimmed out, I attached each code to its coaster using my spray adhesive. Tip: You should cover your surfaces with newspaper before using spray adhesive indoors because of the overspray (this stuff is hard to get off your hands, so I can't imagine what it would be like on counters/tables).  I then weighted the coasters with cans overnight to ensure smooth bonding.


While they came out like I had imagined, I wasn't thrilled - despite my best intentions, my coasters still looked a little rough around the edges, literally:


Then inspiration struck - I remembered that I had leftover black/white baker's twine from my birthday party last year, which would be perfect for edging the Aida cloth! I located it in my craft drawers and set to work. Using craft glue (with toothpicks as applicators), I rimmed the edges of my fabric with the baker's twine, with awesome results.


So. Much. Better. It didn't take me long to trim out all four coasters and, after allowing them time to dry again, bundle them together to take with me on my next trip down to L-ville. It was so much fun giving them to W, since he was not only impressed by their appearance, but also had a blast discovering what each one was as he scanned the code with his phone. Definite win for this girlfriend. :)

Monday, February 3, 2014

Door Décor: Winter Sunburst


Since taking down all my Christmas decorations, my front door has been a stark, sad site. I knew I wanted to buy/make something winter-y to put up there, but I just couldn't figure out what to do. Many ideas I found and liked seemed a bit Christmas-y (you really can't get away with decorating with anything evergreen out of season), and the others seemed to involve hanging a pair of ice skates from a wreath. Don't get me wrong, that's certainly winter-y, but it's also slightly expensive (do all these people just have vintage pairs of skates lying around? Because a pair from eBay seems to run anywhere from $15 to $30, plus shipping). Yeesh. Also, ice skates seemed a bit clunky to store in the off-season (and space is premium at my little semi-studio).

Pinterest gem!
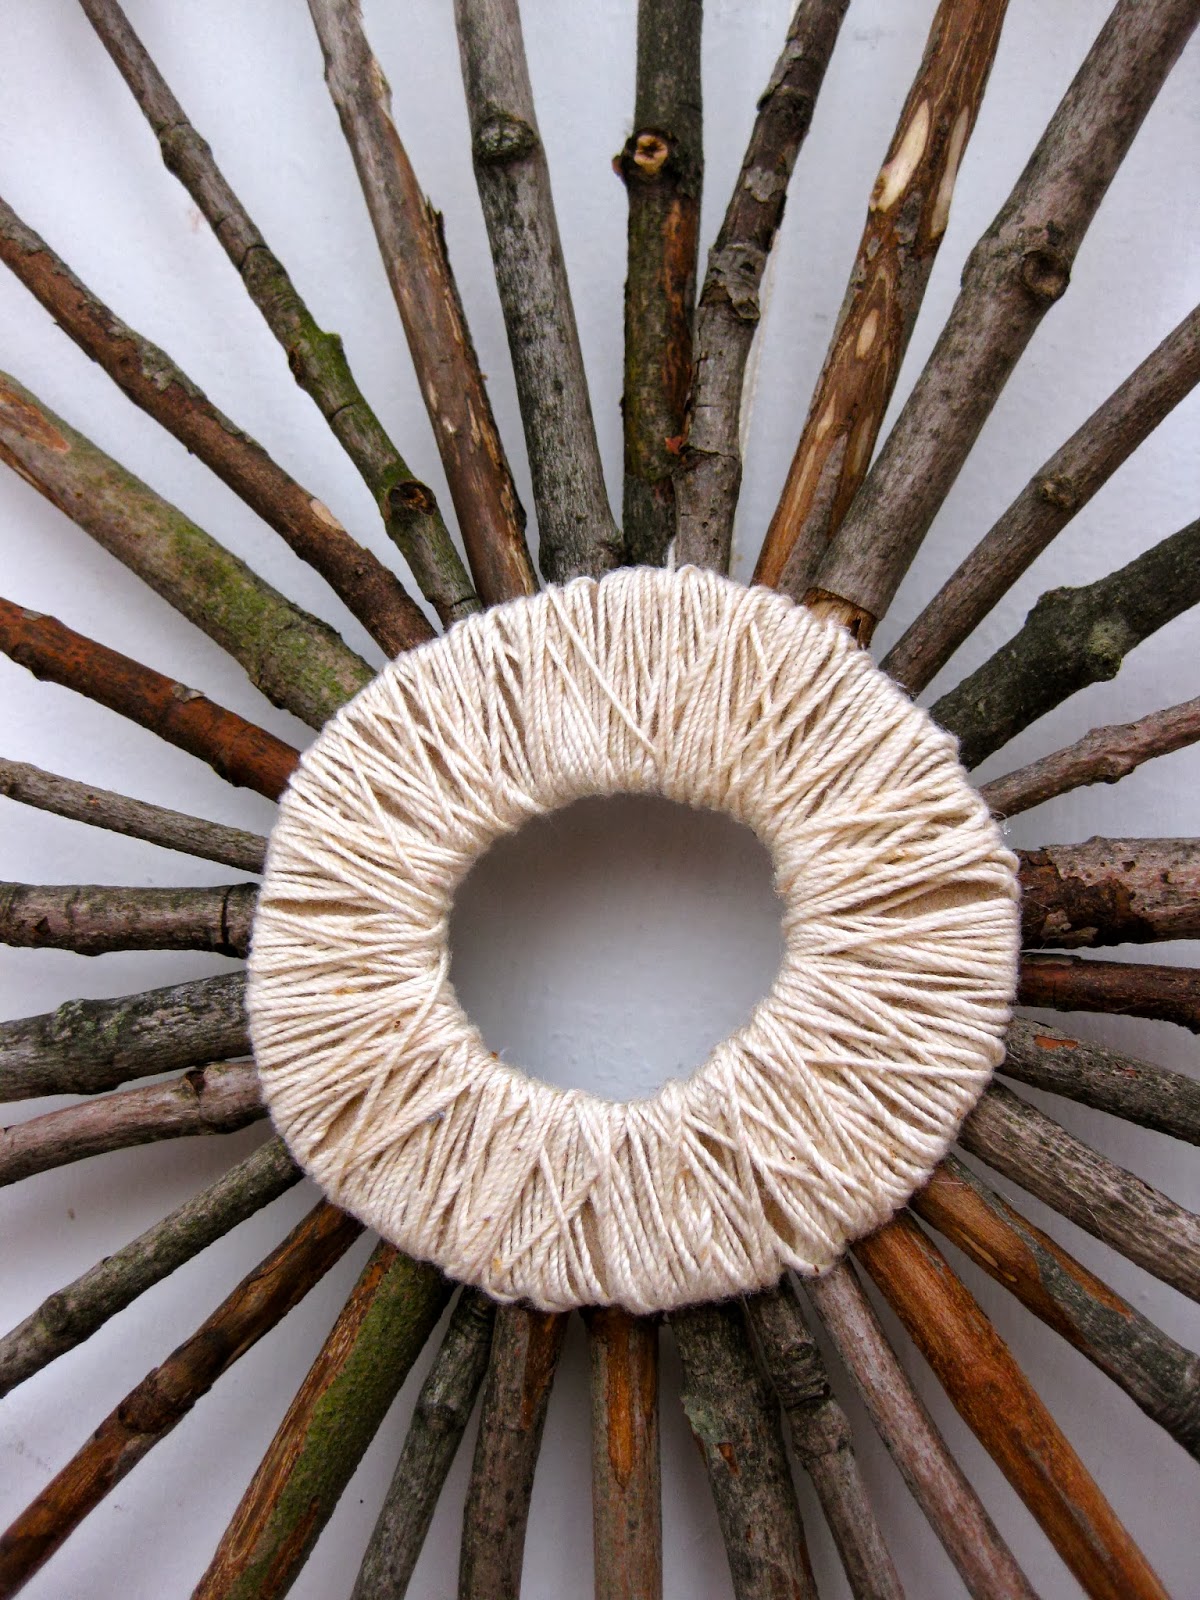
Thankfully, I kept up the search and turned up this little gem on Pinterest. The directions (found on some versions of this pin) were ridiculously oversimplified pictures, the hallmark of a future Pinterest fail, but then a little more digging turned up the original source for the craft - a legitimate craft blog with complete directions and everything! With the assurance that this was a realistic craft, I began gathering my own supplies in earnest. This mainly involved scouring the yard in front of my apartment building for branches and twigs - but I had to wait for the plethora of snow to melt first! I was also glad that the trees around my apartment have a darker-colored bark than the willow twigs pictured, since I have a white door. After breaking down the branches and twigs into usable pieces, I went to my local Wal-Mart for jute twine... and couldn't find any! So, I decided to use what I had on hand, which was plain old twine. I wasn't sure how it would turn out at first, but after wrapping it around a cardboard ring that I cut out (following the blog instructions), it turned out pretty well.

 I ended up estimating the amount of twine I would need, then cutting it from the spool (in order to loop it around the ring). To keep it from tangling, I wrapped it around a clothespin, using it like a needle, if that makes sense. Originally, I had made some paper blossoms out of book pages to adorn my sunburst (following the directions from this site), but I felt that the look was a little cluttered once the twine-wrapped ring was completed. The pics below show what I mean (sorry for the bad quality - night-crafting strikes again!). The left photo was more of a concept shot, before adding the ring and another round of twigs.

The roses are so cute...
... but I just felt that they hindered the clean
lines of the finished sunburst.


 The construction was simple, once my ring was prepped - I simply hot-glued the twigs in sets (four, then eight more, then sixteen) to ensure even spacing and balance in the finished product. I love the random, messy look of the example one, but I seriously doubt I could achieve the same. And, let's face it, I'm meticulous. :P I contemplated leaving the ring in the back like the original picture showed, but I liked the look of the wrapped ring. Good thing, too, since the hot glue looked a hot mess when I was done! I kind of took liberties knowing it would be hidden - and maybe it shows. But nobody will see! Except people reading this...


A quick note on hot glue - if you have a door that gets direct sunlight and tends to cook your door hangings, the glue is probably going to melt. My door barely gets sun (and most winter days in OH seem to be overcast), so I'm not too worried. All in all, once the twigs were gathered, it was an easy evening project, and I love how it turned out! Wintery, natural, and still mod-chic - sunbursts are so popular at the moment! Happy Winter, everyone (we have ANOTHER snow day today... bye, bye Spring Break)!

Wednesday, July 24, 2013

Seashell Wrapping

In case you were wondering, "Mary Call" is
an inside nickname for my mom.
Life's been so busy (and tossing in a cross-country move next week isn't going to help) that I have a feeling these posts are going to be a bit sporadic for awhile. I did want to share an idea, however, that I had this past weekend for incorporating seashells into gift wrap for a present for my mom, since it was simple and came out cute. I had a friend visit for the weekend, and we went to the beach on Saturday (it was a steamy 99 degrees). Since my mom's birthday was also on Saturday, I had an idea for incorporating one of my favorite beach activities--shell collecting!--with wrapping her birthday gift.

I was already planning on tucking her present in a Michaels photo storage box that I had picked up on sale for $2.00 a few months ago (I had actually picked up two, and my mom commented on how pretty they were [she then failed to find them at her local Micahels], so it was an obvious decision!). Since the box had a nautical theme, I thought it would be nice to add some seashells as embellishments. I went to the beach with a mission to collect shells with holes in them, which are plentiful. As luck would have it, we arrived during low tide, so scooping up handfuls of shells/shell fragments to pick through was pretty easy. I tried to sort out a variety of pierced shell bits, and when I set out to incorporate them into my wrapping process, I selected some black-and-white baker's twine, which I had leftover from my Cirque des Rêves party, for stringing. I will admit, it took me a few tries to come up with the idea of simply lacing twine through the shells in a parcel knot (my first attempt involved tying the shells to the ends of the twine... which looked like something a five-year-old would do!). But once I figured out my layout (I actually did tie off the bigger shells on the vertical strand to prevent slipping), it was easy-peasy. It gave the gift a nice touch, and it gave me a reason to collect shells (something I find great satisfaction in doing, despite their tendency to become clutter). So, next time you're at the beach, you can collect shells, guilt-free, and stock up on wrapping embellishments! Double bonus indeed.

Friday, February 15, 2013

Craft-Wrapped Candy Hearts

Boooooooooring!
In case you haven't noticed, Valentine's Day was this week. Personally, I celebrated by working on my graduate thesis (yes, LAME). However, I did spontaneously purchase a package of boxed candy conversation hearts last week, and since I really don't need to eat eight boxes of candy hearts, I thought they would be fun little gifts for a few friends. However, their packaging was a bit plain... so, you know what that means! ;)


In keeping true to this blog's name, I began scouting around for some inspirational ideas that I could recreate with materials I already had. A few weeks ago I scored some fun things at Target during their after-Christmas clear-out:


The cute little owl ornament (I think it was 20 cents?) now sports some bright ribbons that camouflage his little hanging loop and perches on my desk in pretty much the same spot as in the photo. I found the baker's twine for a dollar (incorrectly mixed in with clearance, but still, it was only a dollar!) and have been seriously digging it for the past few weeks - I even purchased brown parcel paper to coordinate with it, which it does, marvelously. And who doesn't love some decorated wooden buttons? At any rate, the baker's twine was the main design element that I wanted to incorporate, so I Googled something to the effect of "Baker's Twine Valentine's Day Decorating Ideas" and got back a slew of results - here are a few:


Top left (from here): Liked the idea of sewing with baker's twine (heads up, it's a bit difficult, even with an oversized cross stitch needle)
Top middle (from here): My new favorite decorating aesthetic - brown parcel paper wrapped with baker's twine
Right (from here): "Stitching" a button on with baker's twine (again, a bit difficult, especially because baker's twine tends to unravel when you mess with it too much... i.e. fuss with it using a needle and needle threader)
Bottom left (from here): SUCH a cute heart garland
Bottom middle (from here): Aha! A way to include my favorite medium: old book! :P

In the end, I chose to wrap my boxes with book pages over brown parcel paper, keeping the baker's twine as an accent and incorporating some of the ideas from above. I also raided my sticker collection (yes, I'm five) and found some great 3D flower stickers that I'd tucked away that introduced a nice blue to the red/pink/white color palette. 


Hmmm, which ones are more awesome? ;)


 I recreated the heart garland with some glittered/patterned cardstock using double-stick tape (a girl's best friend, imho). I did manage to incorporate a button in one design - the difficulty of threading the baker's twine through the needle, then the button, was enough to put me off from trying too much more. So there you have it - it wasn't difficult at all to simply wrap up the boxes (gift-wrapping 101) and decorate with what I had on hand - and they turned out just so gosh darn cute!