Showing posts with label décor. Show all posts

Wednesday, September 24, 2014

Door Décor: Buckle Up, Cowboy!


I decided to challenge myself the other weekend. I thought the front door of W's new apartment looked rather bare, so I took it upon myself to make a door hanger that was manly (his stipulation). And... let's just say the front door is still bare, but the Texas pride shelf in the apartment has a new addition! Eh, I tried. :P

I'm pretty proud of myself for thinking this one up all on my own (aka I didn't find it on Pinterest, although I'm sure it's on there somewhere!). First off, I gathered a slew of belts in Texan colors - red, white, and blue - and a sturdy wooden frame (which was 99 cents!).


The belts were a steal - the gray tags were even discounted at half off!


Total cost for belts: $10.81 (the pink tag was 15% off)

I tested out my idea in the thrift store, so I knew I was coming home with the right amount of belts for what I wanted. After snipping off all the tags, I settled down to work.

I began by wrapping my first belt around the frame and securing it tightly on the back. I played around with the idea of having the belt buckles show but opted for a cleaner look by hiding them.


After wrapping and spacing both of my white belts, I moved to the reds.


To keep the extra lengths from flapping, I slipped a rubber band on each belt and fed the extra bit through until it was smooth and taut. Did this require me to unbuckle/rebuckle each belt? Yes, yes it did. Hindsight is 20/20. I could have trimmed and/or glued the leftover pieces, but I wasn't convinced that these belts' journeys would end as part of a door display, so I left them fully intact, just in case.


I purposefully aligned the buckles on the side opposite the blue in order to balance out the extra weight that came with wrapping two additional belts (three, if you count the star) around one end of the frame.


I linked the two blue belts together to form a single long one, then wrapped it around the left side three times, buckling and banding it in the back. The star was a bit trickier, and I ended up just knotting my final white belt into a rough star-like shape. I think it hints enough at the real thing. :P


I tied a length of suede cord to each top corner, and voilà! There you have it! A manly Texan door hanger shelf adornment for my, well, manly Texan. ;)

Monday, June 23, 2014

Door Décor: Patriotism and Paper Rolls

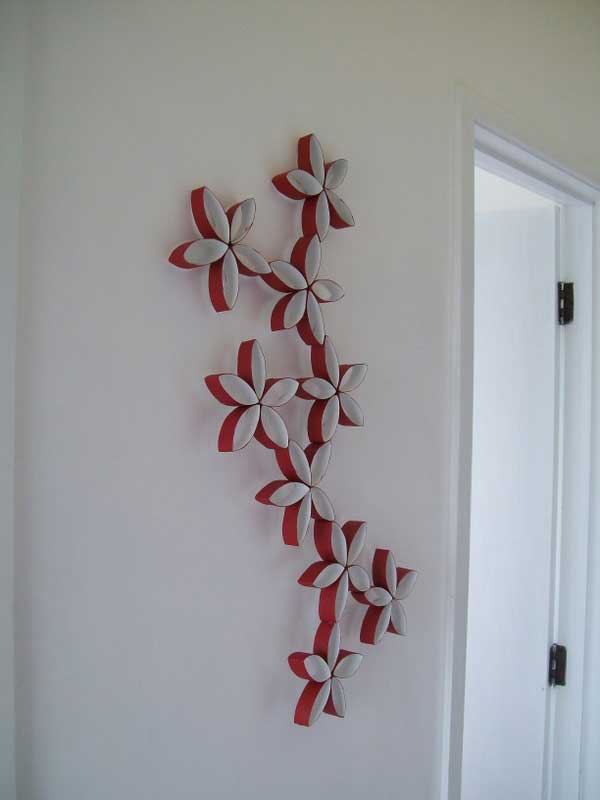
A popular trend that I've been seeing online lately is that of toilet paper roll wall art. No lie. These creations are awesome, and they're made of re-purposed toilet paper rolls.

Wrought Iron
Flowers
Wreaths

Inspired by the above right image, I decided to craft my own toilet paper roll art for my poor bare front door (I took down my winter sunburst a few weeks ago and haven't had time to make a replacement). I knew I wanted something red, white, and blue, since July 4th is right around the corner. So, I set about collecting my supplies (I ended up using three toilet paper rolls and one paper towel roll) and getting to work.

Step One: Painting! I decided to make five flowers, so I painted my three toilet paper rolls (one per flower) red and my paper towel roll blue (out of which I'd make two blue flowers). Luckily I already had red and blue paints on hand, leftover from this craft.


Step Two: Cutting! After the paint dried, it was time to slice it up! A few sites recommended using an X-Acto knife and a cutting board, after meticulously measuring and tracing lines... I used a ruler, marked out sections 3/4" wide down one side of each tube, then sliced them apart using my trusty old scissors. ;)


Step Three: Gluing! It definitely would have been faster to use my hot-glue gun to attach my segments together, but since I was going to be hanging my creation on my front door in June, I knew it would all melt off. I opted for Tacky Glue, which I had on hand, and which will hopefully hold up to the baking sun. *fingers crossed*

I first attached the 'petals' together in sets of two.
After drying all day, I added my third 'petals' into the mix to dry overnight.
The next morning I was ready to combine my sections...
...into a complete flower!

After all my individual flowers dried, I then started laying them out in a variety of patterns until I figured out my final design. I then glued-and-waited one last time (overnight), and the following morning I had my door décor!

I was so glad I had these mini-clothespins (leftover from my 2013 birthday bash) in my craft supplies -
they were super handy for this project!

While I originally liked a vertical layout, I realized it
needed to be horizontal to accommodate my storm door.
There's a better, unobstructed view. :) Also, please ignore
the blurred out apartment numbers - privacy, yo!


Sorry for the blinding-sun vibe on that last pic - the colors of the flowers really weren't coming across in the photo, so I lightened it. I think I'd advise painting the inside of the 'petals' so as to really make the colors pop (maybe a touch-up for next year, if they weather the next few months!). Spray-painting would be an easier route in that case, I'm sure. At any rate, I'm pleased with it and glad to try a new craft that didn't cost a cent (I used a bit of on-hand jewelry wire to hang it)! And, since I am heading off on a grand adventure to Texas tomorrow (by way of L-ville and a certain Texan man of mine), it'll certainly do. ;)

Tuesday, April 1, 2014

Paper Medallions, Take Two

Paper medallions... such easy, cost-effective decorations! They are often used for parties (like mine!), but I decided they would be the perfect touch to my bathroom décor! As you can see, after my initial round of decorating, I still had a blank wall space left above my toilet that needed filling:

Pic from this previous post

So, I hit up Michaels one weekend and selected sheets of cardstock that coordinated with my shower curtain colors.

The tan was really the back of the gold (sticking out at the bottom)!

I also picked up a picture frame from Wal-Mart as a base for my medallion art. I wanted to thrift for one, but I didn't have time before that week's snowstorm hit (didn't it feel like they were weekly this winter??).

Original Frame
Frame with Glass and Backing Popped Out


Following steps similar to these, I scored, folded, and glued the cardstock into medallions of various sizes, which I laid out in a pattern on my frame. I wrapped it with a lightweight wire that I nabbed for cheap at Michaels after Christmas (it's a merry green, but since it isn't visible behind the medallions, it still works). This gave me a gluing base for the medallions.

... then I wrapped the wire.
I started by laying out the design...


I used leftover scraps to ensure a solid hold and simply built it medallion-by-medallion - here's a set of front/back pics of the finished product:

Back, showing attachments
Front, all finished!


After attaching the medallions to the wire and molding it into shape, I affixed my new creation to the bathroom wall and ta-da! Beautiful. :P

Showing the matching sink/wall accents.
So much better than before! And it
matches better than the photo shows.

Sunday, March 16, 2014

Comin' in for a Landing (Strip)

With all the snow days we had these past two months, I was able to finish off a few sections of my apartment that I hadn't had time to work on since starting school. One of these was the little landing strip next to the front door of my apartment. I had a similar setup in my former apartment - I really like the IKEA shelf with brackets look, apparently.

Former Apartment (details)
Current Apartment


 Those who read my original apartment decorating post will notice the two new wall decorations above my little shelf. The Keep Calm sign is a Christmas gift from my parents - my dad found it at one of my favorite craft stores - Hobby Lobby. The little bulletin board is one I picked up in Big Lots for $3.00 and decorated myself. I knew that I wanted to spruce it up some, but I wasn't sure what angle to take. Stamping? Fabric?

Since I wanted it to match the Keep Calm sign, I eventually selected the airmail border as my inspiration, which would give it a nice vintagy-old world feel. I also liked the connection to international mail, since it makes me think of my friends overseas. Having seen others do a similar sort of design on bulletin boards (chevron stripes), I figured I'd pick up a few bottles of craft paint from my local Wal-Mart along with some masking tape and set to work!

Step One: Gather supplies!


Step Two: Outline border space and stripes. I decided to forgo the white stripes, opting to leave those spaces empty (and a little smaller).


Step Three: Paint! I counted/marked out the alternating colors ahead of time - luckily it all spaced out right (I'm not that talented!).


Step Four: Remove tape! I left it to dry for a few hours, but then I was impatient to see whether or not the paint had bled under the tape (my backup plan was to cover the board in fabric if the paint had bled!). Luckily, it worked perfectly!


Step Five: Embellish! I used a stamp that I had picked up at Michaels on sale a few months ago to really seal the deal on the airmail vibe.


 I wanted something to balance out the stamps on the right corner, but I didn't have any other rubber stamps that would work. So, I made my own stamp out of a mini jam jar I use to hold safety pins. It worked great, and after a little bit of online research for inspiration, I filled it in with text (Kandern is the name of a little German village I've visited three times for English Camp). Another nod to my international friends. :) And there you have it, my favorite little spot to pile junk mail and overdue library materials. :P