Showing posts with label gift idea. Show all posts

Sunday, December 7, 2014

Brave New World Bookmarks


At the end of each semester I give a little gift to my seniors (non-food, since that's illegal #ThanksMichelleObama). Since my seniors spend a lot of time outside of class reading an assigned novel (Frankenstein in the fall, Brave New World in the spring) and the last few weeks of class completing a multi-genre project on it, I’ve developed a tradition of giving them bookmarks made from the pages of their particular book. I’ve posted about this craft before, but I did something a little different this past spring.

The first steps were business as usual – pulling out pages from my chosen text and trimming them down to size (I always try to center the book’s title at the top).


However, Brave New World stymied me when it came time to choose an accent detail. Typically I’ve stamped a design of some sort on each bookmark, but I kept coming up empty with Brave New World. So, I decided to utilize the key icons of the book (Greek letters indicating castes) and replicate them on the bookmarks by hand… after looking them up to make sure I drew them correctly!

After making my ‘key,’ I selected a few colors and drew each letter in a variety of shades. Since I knew the higher castes would be more popular (duh!), I allocated them a larger number of bookmarks.


Once I had my bookmarks prepped, I ran ‘em through the laminator (my favorite thing to do!), cut ‘em out, and then used my nifty corner-rounder to finish 'em off. Tip: If you’re going to round corners, wait until after laminating – that way you only have to do it once. A good corner-rounder will punch through laminated paper just as well.


Lastly, I added a little sticker label to the back of each bookmark with references that encompassed the scope of the class (‘epic’ refers to Beowulf, the first text we read at the beginning of the semester). And, there you have it! Maybe not as neat as their stamped cousins, but my students didn’t know the difference. ;)

Wednesday, October 1, 2014

Pill Box (Remix)

A few weeks before Mother's Day this year I stumbled on a blog post detailing how to make this cute candy gift box out of an oversized pill box. I decided to make one for my mom (it's mail-friendly, which is a perk when you live out of state!), and while she liked it, I felt sort of like a child bringing home a macaroni necklace for her mom's birthday. Meh.

However, I really liked the concept, so I remixed it a few weeks later for a cute congrats gift for my brother, who had just finished up his last class for his MBA. He lives in DC, so a mail-friendly gift was just what I needed.


I kept the same ideas from the original, making a few little tweaks to fit my purposes. I used labels to cover both sides of the flip lids (to keep the large day-of-the-week letters from showing) and used Sharpies to write out a more appropriate greeting - "HOORAY!" - for the occasion.

I trimmed out colorful pieces of cardstock to fit inside each compartment (this idea was in the original craft), then decorated each one with a little congrats note.


 After they were all finished, I sprinkled them into the pill box:


 I then tucked a Riesen (T's favorite candy) inside each compartment - they were a perfect fit!


After snapping each lid shut, it was ready to go! The whole thing cost $2.00 - $1 for the pill box (from Dollar Tree) and $1 for a mini bag of Riesens (also from Dollar Tree). Everything else (labels, cardstock, Sharpies) I had on hand. Easy-peasy! 

Tuesday, June 17, 2014

Sweet Treats: Miniature Turtles

Has anyone ever tried to make the little snacks that consist of a pretzel, a Hershey kiss, and an M&M? Has it failed miserably for you? Me, too. And, you're not alone. I have the worst luck with making that (seemingly) simple treat - the kisses never melt right for me. A friend once told me that the chemical makeup of Hershey kisses causes them to harden if you bake them too long, which is exactly what happened as I kept baking mine longer and longer in an attempt to reach the 'shiny, semi-melted' state. I never achieved that state.

However, there is a MUCH easier, and in my opinion, MUCH better variation out there - the miniature turtle. While they are a bit pricier (due to the pecans), it's worth it. When you end up throwing away what is roughly the equivalent of an entire bag of Hershey kisses in the wake of failure, shelling out a bit more for pecans ain't so bad. ;)

Recipe (adapted from the Rolo site):

Small pretzels (I used Butter Snaps, because I can never find the wagon-wheel types)
1 bag of Rolos (this is usually the basis for how many treats I make)
Pecan halves

Heat oven to 350°F. Lay out pretzels on a baking sheet covered with parchment paper (Kroger makes these awesome pre-cut sheets). Top each pretzel with an unwrapped Rolo. Bake 3-5 minutes until the Rolos begin to soften - remove from oven and press a pecan half onto each Rolo while they are still warm. Cool completely (at room temperature or in fridge)... or eat 'em while they're still warm!


These are super easy and, so far, foolproof. I whipped up a batch of these for my coworkers at the end of the school year since I'd been lagging in the department potlucks we'd had (forgot about one, brought juice to another). After letting my mini turtles chill in the fridge overnight, I loaded them into a fun container and left them in the teacher's lounge for everyone to enjoy. I opted for a reference to Aesop's fable rather than making a comment on how slowly the year crawled by. ;)

Wednesday, June 11, 2014

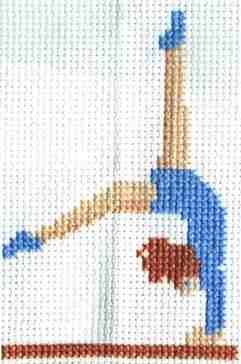
Birthday Cross Stitch: Gymnast

My friend's daughter is an avid gymnast (yes, we've watched The Gabby Douglas Story together), so for her birthday this past fall, I stitched her this sweet little gymnast.  ------------------------------------------------->

I found the pattern on this website (same one where I found the castle pattern I used in this project). The direct link for the pattern can be found here. I like trolling free patterns online every so often and saving ones I think are cute, even if I don't have a specific use for them yet.

The original pattern resulted in the image at left, but I rarely follow the prescribed colors of cross stitch patterns, preferring my own 'floss palette' (which is usually based on colors I already have on hand, lol, but personalization also comes into play). I selected the hair and skin tone colors from my floss collection, aligning them with Claire's coloring as best I could. I also decided to remove the shoes, since the girls at her gym compete barefoot (I've been to a meet!). For the leo, I used teal, which is (was?) C's favorite color. I free-stitched her name in the remaining white space to really personalize it and tucked it into a fun frame that I found at Wal-Mart.

It came together really nicely, and she definitely liked it. 
And, I know for a fact that it's displayed in her bedroom upstairs, so there's the proof. ;)

The fabric isn't wrinkled - I always catch reflections in the frame glass!

Tuesday, April 29, 2014

QR Coasters

A few weeks ago I had the privilege of visiting my boyfriend's bachelor pad for the first time. Among other things, there was a notable lack of coasters for his freshly-purchased (and newly constructed with the help of yours truly) IKEA coffee table. Since W is well-aware of my crafty tendencies, he made an offhand comment that I could "make some crafty ones." I tucked that little statement away, mulled it over, and came up with an idea that manifested itself as these:


But let me start from the beginning. As you might be aware, one of my favorite crafting pastimes is cross-stitching (proof, more proof, even more proof). While cross stitch isn't always the most manliest of things (I'm thinking of the samplers of yore), I'd already experienced success with cross-stitching QR code magnets for friends' Facebook pages in the past, which made me think that such an approach would work for coasters as well.

I followed similar steps to those outlined in the blog post above, using a free QR code generator (like this one) to turn my web addresses into QR codes, which then function as ready-made cross stitching templates, thanks to the beauty of pixelation. What web addresses did I use, you ask? Well, I knew I wanted to create a set of four coasters, and I knew I didn't want to cross stitch the same pattern four times. So, I decided to do a series. For the sake of consistency, I elected to use Wikipedia sites for the basis of all my codes, varying the content to reflect my boyfriend's interests. Since I'm dating a Texan, the first one had to be the Alamo, with Hank Williams coming in as a close second. :P Since I also happen to be dating a former seminary boy, G.K. Chesterton has made it into quite a few of our conversations, and therefore into the coaster series. And since the best presents include inside jokes, the last one was for Yorkies. ;)

I also wanted to deviate some from the typical black-and-white QR color scheme, and since W is a proud Aggie, I settled on using Texas A&M colors (which are technically maroon and white, but I mixed in the black) for my coasters.


I varied the color-mixing across the codes, experimenting with different layouts. I grew more confident in my integration skills as I went along, but I'm not going to lie and say I didn't have to go back and rework a few places where I had gotten off-track. ;)


After completing the stitching, my next step was turning these bad boys into coasters. I had originally purchased cork squares from Michaels to use, but I wasn't sure how to make them work. Then I stumbled on these babies at Target. Their little rimmed edges seemed perfect for my project, especially since I wasn't sure how to keep the edges of my Aida cloth from unraveling. I had already picked up a bottle of spray adhesive at Michaels, so I was prepped and ready to go!


I made a template (using junk mail!) to aid in trimming out my codes to fit inside the coaster rims. Once all four codes were trimmed out, I attached each code to its coaster using my spray adhesive. Tip: You should cover your surfaces with newspaper before using spray adhesive indoors because of the overspray (this stuff is hard to get off your hands, so I can't imagine what it would be like on counters/tables).  I then weighted the coasters with cans overnight to ensure smooth bonding.


While they came out like I had imagined, I wasn't thrilled - despite my best intentions, my coasters still looked a little rough around the edges, literally:


Then inspiration struck - I remembered that I had leftover black/white baker's twine from my birthday party last year, which would be perfect for edging the Aida cloth! I located it in my craft drawers and set to work. Using craft glue (with toothpicks as applicators), I rimmed the edges of my fabric with the baker's twine, with awesome results.


So. Much. Better. It didn't take me long to trim out all four coasters and, after allowing them time to dry again, bundle them together to take with me on my next trip down to L-ville. It was so much fun giving them to W, since he was not only impressed by their appearance, but also had a blast discovering what each one was as he scanned the code with his phone. Definite win for this girlfriend. :)

Tuesday, April 22, 2014

Paper Chain Countdown


A few months ago, a chain made out of construction paper appeared in the teacher's lounge. It had alternating links of red and white (our school colors) and while it did lend an air of festivity to the place, I wondered aloud why it was there. Another teacher informed me that the art teachers had made it for a teacher who was retiring this year. Each link represents a day he has left, and at the end of every day he breaks one off. I must say, it's been fun watching that chain shrink these past weeks (c'mon summa time!), so when my mom, who is also a teacher, confided to me her shared eagerness for the approaching summer, I decided to make a little countdown chain for her to enjoy as well!

-o-o-o-o-o-o-o-o-o-o-o-o-o-o-o-o-o-o-o-o-o-o-o-o-o-o-o-o-o-o-o-o-o-o-o-o-o-o-o-o-o-o-o-o-o-o-o-o-

For my links, I selected a cheery yellow cardstock and selections from Sense and Sensibility - quite the combo, I know. ;) I wanted the chain to be travel-sized, since I was mailing it to her, so I made the links as small as I could (using my stapler as a guide).


After creating my chain of 29 links (the number of schooldays she has left!), I added a little clarifying tag to the chain's end. And yes, I'm the kind of person who purchases green staples. Because I can.


Luckily, I had the perfect-sized box to package my chain. After lining it with tissue paper, I coiled up the chain and nestled it inside. I tucked in a little note as well (Mary Call is a little inside joke, as I've previously mentioned). It's set to arrive this week (during which she's on Spring Break, conveniently, so I could safely settle on my number of chain links). It was such an easy craft, and I hope it offers her encouragement in the days to come!

Friday, December 13, 2013

Handy Halloween Treats

Yikes, this is overdue, but I wanted to put it up now - better late than never, right? These are some handy treats I whipped up for my colleagues right before Halloween this year. The ingredients are simple: clear plastic disposable gloves, popcorn, and candy corn! I wish I could remember where I first saw this idea, but it's been years. I think it was a magazine. At any rate, the process is so easy - the hardest thing is probably tying off the bags once their full, since you tend to have slippery fingers (from the buttery popcorn!). Just drop a piece of candy corn in each finger, then fill the glove with popcorn - you made need to work it a little to fill out each finger. Then tie it off with a twist-tie - I slipped notes on mine as well. Fun, cute, and easy! :)

Friday, September 6, 2013

Gifts with Personality

I'm a closet psychologist. I love things like birth order, Pavlov's dog (especially The Office version!), and, of course, Myers-Briggs. For those of you who aren't familiar with Myers-Briggs, it's a method of breaking down personalities into 16 different types, based on a set of 8 personality indicators (like, E[xtroverted] vs. I[ntroverted], T[hinking] vs. F[eeling], etc.). For example, I'm an ESFJ, which means I test higher in the Extroversion, Sensing, Feeling, and Judging categories. But as I always test 60/40 Feeling/Thinking, it's not surprising that I tend to go with my gut in making decisions, but I still feel compelled to research all the details.

Anyway, the Myers-Briggs Foundation had a 70th anniversary this past year, and as a part of their celebration, they released these nifty little MB profile heads on their site. The profiles display the most common traits associated with each personality type - here's mine as an example:


They still have these, by the way - you can get your own MB personality profile heads here (I'd recommend opening your selected image in a new tab to see the link for downloading the PDF). If you're unsure of your personality type, by all means, take a free MB test to find out (I'd suggest taking a few different ones for cross-reference - sometimes people test differently, although I always come out ESFJ, no matter the test or passage of time). Here's a Jung Typology Test from HumanMetrics and a Jung Personality Test from Similar Minds, both of which I've used before. Don't let the 'Jung' name throw you off - Carl Jung is the guy who developed the theory of personality typology that the Myers-Briggs test is based on.

Ok, back to crafting. Over the years I've compelled my parents to take these tests... a few times, since I would forget their results lol. Luckily, they've always been fairly good-natured about my closet obsession. Since I had their results on hand when I first became aware of these MB profiles, I thought it might be fun to turn these freebies into a quirky and unique anniversary gift!

Step One: I printed both of their MB profile heads onto cardstock by saving each PDF as an image (you could also screenshot it) and inserting it into Microsoft Word. That way I could control its sizing on the page - I wanted the profiles to be 4"x4" to fit the frames I had.

My mom and I are both ESFJs, whereas my dad's an ISTJ

Step Two: I found these framed mini canvas sets at Hobby Lobby and thought they were a perfect (and cheap!) way to frame out my MB profiles. I removed the canvas (it was wrapped separately) and simply secured the profile to the back of the frame with tape.


I made this one for a friend.

Step Three: I don't have pictures of this step, but in short, I wasn't thrilled with the quality of a few of the frames - the one above was fine, but the two I used for my parents' MB profiles had a few rough spots. To hide the flaws and make their gift a bit nicer, I purchased some black grosgrain ribbon and gave each of the frames a nice trimming. The ribbon was almost the exact width of the framing, so layering it on top of each strip was an almost imperceptible change. It just covered the rough spots and added a bit of heft.

Overall, they came out really cute, and my parents got a kick out of them when they opened their present (I had it pre-wrapped, since I moved out-of-state before their anniversary). It's always fun to learn more about your loved ones - and then turn it into an opportunity for gift-giving and affirmation! I'm pretty sure that's the ESFJ coming out. ;)