Showing posts with label cross stitch. Show all posts

Wednesday, June 11, 2014

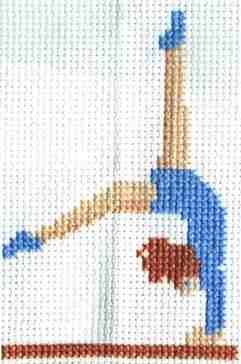
Birthday Cross Stitch: Gymnast

My friend's daughter is an avid gymnast (yes, we've watched The Gabby Douglas Story together), so for her birthday this past fall, I stitched her this sweet little gymnast.  ------------------------------------------------->

I found the pattern on this website (same one where I found the castle pattern I used in this project). The direct link for the pattern can be found here. I like trolling free patterns online every so often and saving ones I think are cute, even if I don't have a specific use for them yet.

The original pattern resulted in the image at left, but I rarely follow the prescribed colors of cross stitch patterns, preferring my own 'floss palette' (which is usually based on colors I already have on hand, lol, but personalization also comes into play). I selected the hair and skin tone colors from my floss collection, aligning them with Claire's coloring as best I could. I also decided to remove the shoes, since the girls at her gym compete barefoot (I've been to a meet!). For the leo, I used teal, which is (was?) C's favorite color. I free-stitched her name in the remaining white space to really personalize it and tucked it into a fun frame that I found at Wal-Mart.

It came together really nicely, and she definitely liked it. 
And, I know for a fact that it's displayed in her bedroom upstairs, so there's the proof. ;)

The fabric isn't wrinkled - I always catch reflections in the frame glass!

Tuesday, April 29, 2014

QR Coasters

A few weeks ago I had the privilege of visiting my boyfriend's bachelor pad for the first time. Among other things, there was a notable lack of coasters for his freshly-purchased (and newly constructed with the help of yours truly) IKEA coffee table. Since W is well-aware of my crafty tendencies, he made an offhand comment that I could "make some crafty ones." I tucked that little statement away, mulled it over, and came up with an idea that manifested itself as these:


But let me start from the beginning. As you might be aware, one of my favorite crafting pastimes is cross-stitching (proof, more proof, even more proof). While cross stitch isn't always the most manliest of things (I'm thinking of the samplers of yore), I'd already experienced success with cross-stitching QR code magnets for friends' Facebook pages in the past, which made me think that such an approach would work for coasters as well.

I followed similar steps to those outlined in the blog post above, using a free QR code generator (like this one) to turn my web addresses into QR codes, which then function as ready-made cross stitching templates, thanks to the beauty of pixelation. What web addresses did I use, you ask? Well, I knew I wanted to create a set of four coasters, and I knew I didn't want to cross stitch the same pattern four times. So, I decided to do a series. For the sake of consistency, I elected to use Wikipedia sites for the basis of all my codes, varying the content to reflect my boyfriend's interests. Since I'm dating a Texan, the first one had to be the Alamo, with Hank Williams coming in as a close second. :P Since I also happen to be dating a former seminary boy, G.K. Chesterton has made it into quite a few of our conversations, and therefore into the coaster series. And since the best presents include inside jokes, the last one was for Yorkies. ;)

I also wanted to deviate some from the typical black-and-white QR color scheme, and since W is a proud Aggie, I settled on using Texas A&M colors (which are technically maroon and white, but I mixed in the black) for my coasters.


I varied the color-mixing across the codes, experimenting with different layouts. I grew more confident in my integration skills as I went along, but I'm not going to lie and say I didn't have to go back and rework a few places where I had gotten off-track. ;)


After completing the stitching, my next step was turning these bad boys into coasters. I had originally purchased cork squares from Michaels to use, but I wasn't sure how to make them work. Then I stumbled on these babies at Target. Their little rimmed edges seemed perfect for my project, especially since I wasn't sure how to keep the edges of my Aida cloth from unraveling. I had already picked up a bottle of spray adhesive at Michaels, so I was prepped and ready to go!


I made a template (using junk mail!) to aid in trimming out my codes to fit inside the coaster rims. Once all four codes were trimmed out, I attached each code to its coaster using my spray adhesive. Tip: You should cover your surfaces with newspaper before using spray adhesive indoors because of the overspray (this stuff is hard to get off your hands, so I can't imagine what it would be like on counters/tables).  I then weighted the coasters with cans overnight to ensure smooth bonding.


While they came out like I had imagined, I wasn't thrilled - despite my best intentions, my coasters still looked a little rough around the edges, literally:


Then inspiration struck - I remembered that I had leftover black/white baker's twine from my birthday party last year, which would be perfect for edging the Aida cloth! I located it in my craft drawers and set to work. Using craft glue (with toothpicks as applicators), I rimmed the edges of my fabric with the baker's twine, with awesome results.


So. Much. Better. It didn't take me long to trim out all four coasters and, after allowing them time to dry again, bundle them together to take with me on my next trip down to L-ville. It was so much fun giving them to W, since he was not only impressed by their appearance, but also had a blast discovering what each one was as he scanned the code with his phone. Definite win for this girlfriend. :)

Friday, May 17, 2013

Wedding Cross Stitch: Teeny Tiny Taj Mahal


I attended a wedding reception this past weekend for my friends who eloped earlier this year, and yes, I cross stitched a little something for the happy couple! Since I had just finished all of my grad work for the semester (and degree!) last Friday, that didn't leave me much time. It was sometime after midnight on Friday that I remembered that I didn't have any sort of gift for the following day.

Luckily, I already had this little frame on hand, which I picked up from Michaels not too long ago. It was so cute that I knew I could use it in some way - and it was perfect for this craft! As a rule, I don't really like putting pieces of cross stitch behind glass - it can be a tight fit, it negates their three-dimensional aspect, etc. So, when I pulled away the backing of my mini frame, I was pleased to discover that its 'glass' was really just a cheap plastic film, adhered to the backside of the frame itself.  A few slices with my Exacto knife, and I had what I wanted:

A few slices of the blade...


Such craftmanship... ha!


... and Ta-Da! A pane-less frame, painlessly achieved. ;)

At this point, it was probably something like 2am, so I left my prepped frame empty for the night. The next morning, I started brainstorming for pattern ideas. I wanted something meaningful for the couple, but not just their initials or something since it was already such a little piece. I began trolling their Facebook pages (shameless, I know) for ideas - mainly colors, at first (they are in the process of merging households). However, I stumbled on a cache of photos of their travels to India this past fall. If memory serves correctly, my friend joined his then-girlfriend as she was on a service trip to the country... though the details escape me. At any rate, during their time there they visited the Taj Mahal together and took a few adorable couple photos, which served as the basis for my inspiration.

Once I knew I wanted to cross stitch them a teeny tiny Taj Mahal, I set about finding a pattern (I'm not the best pattern-generator, even with graph paper [been there, tried that]). After casting about fruitlessly online, I remembered my QR code cross stitching experience and typed: "pixelated taj mahal" into Google (or something like it). While wading through those results, I finally hit paydirt:


I don't know what those beads are, or what this item is, really - I cropped the image down a bit (the original has INDIA spelled out underneath, and I didn't really think that was necessary). I would link you to the source page, but when I attempted to visit it via Google Image, my browser freaked out, saying it wasn't safe. So, I just captured a screenshot from the safer Google Image vantage point. After doing some math (translating the pattern onto Aida cloth in terms of size), I knew I had a solid winner. After rooting around my thread collection, I settled on a combination of burnished orange and gold for contrast.

The gold thread is a little bit of a pain to work with, to be honest - it has a more wiry constitution, if that makes sense. It was worth the mini hassle, though, because the mini Taj Mahal came out so well! What do YOU think?

Click to Enlarge


Yeah, I sneaked my initials in the bottom-right corner. The right image is for copying purposes, if anyone finds themselves in need of a solid miniature Taj Mahal cross stitch pattern. :P

I used double-stick tape to attach my cloth to the frame backing to hold it in place, which worked really well. In case you're curious, the project only took 3-4 hours total (I indulged in the ABC Family Harry Potter marathon while stitching). Here's my finished result:

Friday, March 15, 2013

Wedding Cross Stitch: Joshua 24:15

Yup, I did it again. I'm kinda shameless like that. The Story: I was invited to my friend Scott's wedding, which took place on New Years Eve near Lynchburg, VA (the town of his fiancee's alma mater). It was a destination wedding, in a sense, since we had to book hotel rooms, and that cost me a bit more (ok, double) what I usually budget for a gift. Discussion abounds on the etiquette of gift-giving for destination weddings (yes, I realize they usually involve beaches or other countries), but long story short, my poor-little-grad-student self elected to take the handmade route! :)

I came across this blog post and fell in love with the pattern - I felt it would not only commemorate Scott and Katie's new home together, but it also reflected their shared passion for missions:


Unlike the lovebird pattern I used for Laurie and Ross' wedding cross stitch, this one was much easier to enlarge and print as a pattern - it even came with measurements. I did add an extra little detail to the design, though:

Sorry for the reflection - this was taken after I framed it!

Isn't it cute? I got the idea from the wedding invitations, which (I'm pretty sure) were an homage to Katie's maiden name. I had found the mini castle pattern on this site a few months earlier - that's why it's always a good idea to tuck these things away! I made a few adjustments, stitched in a few rolling hills, but overall kept pretty true to the pattern below:


Since the verse results in a narrow rectangular design, I knew that I wanted to mat it out somehow to fit an 8"x10" frame. As I've mentioned previously, Michaels has this really neat textured felt - it's a pretty small selection, but lo and behold, they had a stonework one in a really nice grey that complemented my design concept brilliantly! I also picked up some black grosgrain ribbon at Hobby Lobby (they sell these itty bitty spools that are perfect for crafting projects!) to 'hem' my stitched piece on the felt matting and scored a nice 8"x10" frame there as well. After assembling, here's the finished result:


I love the incorporation of the castle imagery and stonework with the idea of a household. But, that's just me. Hopefully the newlyweds can find a place for it in their, well, new household. :P

Bonus Segment: I really liked how the wrapping turned out for this gift, so I took a shot of it to share! I had found another mini ribbon spool in a clearance bin at Hobby Lobby that was patterned with the letter "S," which was perfect since Scott's last name begins with an "S." And I had nabbed the "Eat, Drink, & Be Married!" ribbon on clearance at Michaels a few weeks earlier. Combined with some chic black, grey, and white striped wrapping paper (courtesy of my roomie!), it came out rather nicely, I thought.

"But if serving the Lord seems undesirable to you, then choose for yourselves this day whom you will serve, whether the gods your ancestors served beyond the Euphrates, or the gods of the Amorites, in whose land you are living. But as for me and my household, we will serve the Lord." -- A little OT Chuck Norris, there. ;)

Friday, February 8, 2013

QR Code Cross Stitch

I like to cross stitch. I really like to cross stitch. True, this hobby has lain dormant from time to time, but if you choose your projects well, you can nurture an interest such as mine for years. However, there is serious burn-out potential if you are overly ambitious in your pattern-choosing - beware! :P

A lovely nineteenth century sampler
Warning aside, another danger of crafting is clutter. Not the oh-I-went-a-little-crazy-at-the-Michaels-clearance-bins clutter, more like piles of finished projects that have no home. I usually craft with a purpose to avoid this, and one of the best purposes is gift-giving! The only problem is that cross stitch often has an aura of old-fashioned staleness lingering about it, and for good reason (see at left). At best, most probably don’t see cross stitch as terribly trendy (again, see at left), but I have recently discovered how ridiculously digital-friendly cross stitch can be, thanks to pixelation.
Pixelated Images
Pixelation is a classic feature of early video games, especially, making classic icons from games such as Mario (see right) easily translatable to cross stitch.
 Another digital icon that lends itself well to cross stitch is the QR code. For those of us who don’t have smartphones (and some who do), QR codes or Quick Response codes are those little square barcodes that adorn products, magazine ads, everything nowadays. In short, they simply act as hyperlinks for smartphones to read - you take a picture of one, and bam! it takes you to a certain website. What’s cool is that you can personalize this feature, which is what I did for a few friends this past Christmas, using their Facebook profiles as the source sites for the codes. It was a fun way to incorporate some of my favorite aspects of gift-giving: personalization, hand-madeness, and shared interests (all of us have taken DH classes together). To see my creative process (and how to make your own cross stitch QR codes), just scroll down through the instructions below! 
Step 1: Choose a website - my friend Nigel's Facebook page is http://www.facebook.com/nigel.lepianka?fref=ts (in the case of FB, you can either use the stand-alone link or the ref=ts one).
 

Step 2: Generate the QR code, which is pretty easy. I use the site http://qrcode.kaywa.com/ - paste your website in the blank and click “Generate Free.”
  

**Update: Kaywa has changed their website interface - they now designate their options as 'Dynamic' and 'Static' instead of 'Safe' and 'Free.' The default setting is (of course) Dynamic, which requires creating an account on the site. To generate a QR code for free, click the little slider to select the Static option, then click the gray button.

Step 3: Save/Enlarge QR code - right-click to save the image as a file. I like importing the image into Microsoft Word for enlarging, labeling, and printing.


Step 4: Choose a dark/vibrant thread color - I researched this a little - it’s not really recommended that you invert colors (i.e. dark background and lighter thread) and you need to make sure the color is dark enough that there is a contrast. I’ve used black, a bright cerulean blue, a vibrant red, and a deep blue - all scanned fine. It’s hard to test the limits, though, without potentially wasting a lot of time and effort. 
Only $1.99 at Michaels!
 Step 5: Stitch! The pixels form their own pattern - each pixel translates to an X, resulting in a finished piece that measures about 3"x 3" - Michaels has these cute square magnetic frames for $1.99, which work perfectly for this project. I used the inset to cut out a piece of black cardstock for backing, then trimmed down the fabric and attached it to the cardstock (I used double-stick tape!). When you are done, you have an awesome, personalized, tech-friendly homemade gift that isn't antiquated at all - if anything, it's biggest danger is obsolescence! ;)

It really scans!                                                                                   Shot of the Back

Thursday, January 24, 2013

Wedding Cross Stitch: Lovebirds

I hate going to weddings empty-handed. However, I am also a flat-broke graduate student, so my budget is pretty tight. Therefore, when faced with the conundrum of invitations to both a bridal shower and wedding (which has happened a few times), I have begun choosing the crafty gift route (in the dual sense of the term!).

Scenario: I was invited to my good friend's bridal shower this past summer, at which I gifted her (and her future husband!) with a few items from their registry at Bed, Bath, and Beyond. It was fun, and it felt good to give things I knew they wanted (I've watched enough sitcoms to know that you should always purchase from the registry!). However, I wasn't sure what to do when their wedding date drew near. Opinions on gift etiquette differ, but as I said before, I hate attending weddings empty-handed (though according to one commenter, that's actually not as thoughtful as mailing a gift - who knew?), and I really love this couple, so I wanted to bring something to their special day. In the past I've purchased two gifts from the registry in this situation, but that was back when S was for Salary, and not Stipend. ;) So, I decided to get crafty.

Original Pattern
Thoughtfulness and crafting often go hand-in-hand, and I wanted to make something simple and sweet to bless the home of this couple. I had stumbled upon this cute piece of cross stitch a few weeks earlier, although it was a little less-than-ideal in its original format (its accompanying cross stitched caption was an expletive against hipsters… yeah…), so this is the cropped version. And it's the only version I could find - there were absolutely no others, meaning I was at the mercy of blurry pixelation when I zoomed in on the silhouettes. So, I ended up guessing a bit while stitching, but in the end it all turned out okay.
My Replication - yes, I snuck my initials in!

I made sure to take really close-up pictures to nix the blurry blues if I ever use this pattern again. In retrospect, my perfectionist self might move the beak of the right bird up one square… but, to use my mom's term, it's 'handmade.' :) I used the couple's wedding colors to stitch their names and wedding-now-anniversary date, and it came together as a nice remembrance of their special day. Since I was unsure of their decor, I kept it small - no one wants a large, non-matching piece of craftiness hulking in the corner! :P Actually, since the wedding I've seen this little piece perched on a nightstand in their bedroom, which is pretty special. 

And there you have it, folks. A cute, creative way to celebrate the union of a godly couple.