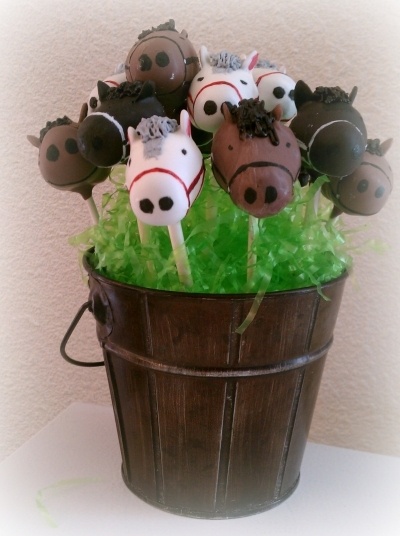
A few weeks ago I went with my family up to PA to celebrate the first birthday of my cousin's twin boys (whom I had never seen!). Let me tell you, they were seriously adorable little guys. Their party had a western theme, with desserts like Rice Krispies hay bale treats and miniature horse cake pops. My mom was especially taken with the cake pops that my (other) cousin made for her little nephews, especially since her annual Reading Rodeo was approaching. So, we decided to test out our cake-pop-making skills a few days after the party. Our first step was research on Pinterest (of course). Mom found a few images for inspiration:
Yeah, they are pretty cute, huh? Mom decided to try making ones that are a bit L-shaped, so we started out by taking our pre-baked, pre-crumbled cake and mixing it with icing until it held together while still being a bit crumbly. Then we started pinching out little bits and rolling/shaping them into the little L's for our horse heads (feel free to insert a
Godfather reference here). They don't necessarily look very... appetizing in the pics below, but I faithfully rendered each step of the process for posterity (you can click to enlarge - Blogger's sizing options are super limiting, and I already messed up this entire post once by thinking I'm an HTML master... which, sadly, I'm not):
 |
| Step Two: Mix cake and icing... |
 |
| Step One: Bake, scrape, and crumble! |
 |
| ... and mold into L-shaped horse heads! |
 |
| So... yummy...? |
Once we had our horse heads prepped, we melted some chocolate almond bark and prepped our lollipop sticks (you dip them in the chocolate, then insert them into the bottom of your pop - I suppose it strengthens the attachment?). After placing them in the freezer for 20 minutes, we were ready to coat the pops with chocolate. We melted more almond bark and dipped our pops in the chocolate, which was pretty thick, so it dried a little unevenly in places... While it was still cooling/hardening, we pressed
candy eyes (yup, they're back!) into each side of the heads. Despite our best efforts, the placement was off a bit on some... At any rate, we eventually had some funny-looking horse heads drying on our
cake pop stand, which we bought from Wal-Mart:
 |
| Step Three: Melt almond bark... |
 |
| ...and dip sticks, then insert in pops! |
 |
| Step Four: Coat pops in chocolate, press on eyes. |
 |
| Don't... let... them... touch! |
Once all the pops dried, they were ready to be iced so that they resembled horses... and not dinosaurs... We added manes and ears, bursting into peals of laughter in the resulting personalities such finishing touches created. We also added little nostrils with black food coloring paste and a toothpick.
 |
| Candy eyes and oatmeal ears! |
 |
| ^_^ |
 |
| This was our exemplar... which should tell you something... |
Well, are we going to go into the cake pop biz? Uh, no. Mom made up a fun little reason for the more deformed pops (not pictured... because they were embarrassing!) - it went something along the lines of "These cake pops aren't the same - they are all different. And some look like they were in a car accident." And, bless them, six-year-olds don't really care what cake pops look like. Some of them actually got a kick out of the story and deliberately chose the more disfigured horses to consume. And, I must admit, they
were delicious, albeit a bit too ambitious for my dear mother and me. :)